
There is something truly wonderful about a perfectly put-together braid, is that not so? It's a very stylish choice, and it looks quite chic too. A nice braid, you see, keeps your hair away from your face. It also gives a fun little change to how you usually look, adding a special touch to your everyday style. This way of doing hair has been popular for a long time, and it's easy to see why, actually.
This article is an easy guide for learning how to braid hair. You will also get to learn how to do a French braid and a Dutch braid, which are very popular styles. If you have never braided your own hair before, you will find this helpful. We will go over the simple parts of braiding. Then, we will get some practice in. Pull up to your mirror, and let us get ready to learn, so.
Braiding hair is a kind of art. It can make any hairstyle look better. This is true whether you are getting ready for a simple day out or a very special event. Knowing the simple ways to braid can make you feel more confident, too. Braids are a big area, with so many different kinds and ways to try them. In this full guide, we will look at how to braid hair. We will share tips for making really nice braided hairstyles. We will also talk about how to take care of your braided hair. This helps keep it looking good and feeling healthy, you know.
Table of Contents
- Getting Ready for Your Braid
- The Classic Three-Strand Braid: A Good Start
- Learning the French Braid: A Smooth Style
- Trying the Dutch Braid: The Raised Look
- Making a Fishtail Braid: A Delicate Touch
- Trying a Rope Braid: A Simple Twist
- Caring for Your Braided Hair
- Frequently Asked Questions About Braiding
Getting Ready for Your Braid
Before you begin braiding, a little preparation helps a lot. Your hair should be clean and dry, or just slightly damp, for the best hold. A good brush or comb is very useful to get rid of any tangles. This makes the braiding process much smoother, you know. Some people like to use a little bit of styling product, like a light cream or a smoothing serum. This can help keep flyaways in place and give your braid a polished look, too.
Gather your tools before you start. You will need a hairbrush or a wide-tooth comb. A few hair ties or small elastic bands are also important for securing your braid when you are done. A mirror is very helpful, especially when you are learning to braid your own hair. Having everything ready means you can focus on the steps without stopping, which is pretty good.
Make sure your hair is easy to work with. If it is too slippery, it might be hard to hold the sections. If it is too dry, it might break easily. A good balance is key. You might want to try braiding after a day or two of washing your hair. This sometimes gives your hair a bit more grip, you see. This simple readiness makes a big difference in how your braid turns out, actually.
The Classic Three-Strand Braid: A Good Start
The classic three-strand braid is the very first step for anyone learning how to braid hair. It is the basis for many other styles. Once you get this one down, other braids will seem much easier. This braid is simple, but it looks very nice. It is a good choice for keeping hair tidy or for adding a basic, pretty detail to your look. You can do this braid on a ponytail, or on sections of hair, or even all of your hair, so.
This braid is all about crossing hair sections over each other. You divide your hair into three equal parts. Then, you move the outside sections towards the middle. It is a simple pattern that you repeat until you reach the end of your hair. This repetition is what makes the braid. It might take a little practice to get the tension just right. But with a bit of trying, you will get the hang of it, you know.
Step-by-Step: Classic Braid
1. **Prepare Your Hair:** First, brush your hair to remove any knots. Make sure it is smooth and easy to separate. You might want to pull your hair back into a ponytail first if you are starting there. Or, just gather the section you wish to braid, you see.
2. **Divide into Three:** Take the section of hair you want to braid. Divide this section into three equal parts. Hold one section in your left hand, one in your right hand, and the middle section with either hand, or let it hang for a moment, too.
3. **Cross the Right Over:** Take the section of hair in your right hand. Cross it over the middle section. The hair that was in the middle is now on the right. The right section is now in the middle. This is your first crossing, so.
4. **Cross the Left Over:** Now, take the section of hair in your left hand. Cross it over the new middle section. The hair that was in the middle is now on the left. The left section is now in the middle. You are creating a pattern, you know.
5. **Repeat the Pattern:** Keep repeating steps 3 and 4. You will cross the right section over the middle, then the left section over the middle. Do this all the way down the length of your hair. Keep your grip steady, but not too tight, actually.
6. **Secure the End:** Once you reach the end of the hair, where it becomes too thin to braid further, secure it with a hair tie or an elastic band. You can leave a little bit of hair unbraided at the very end. This finishes your classic braid, you see.
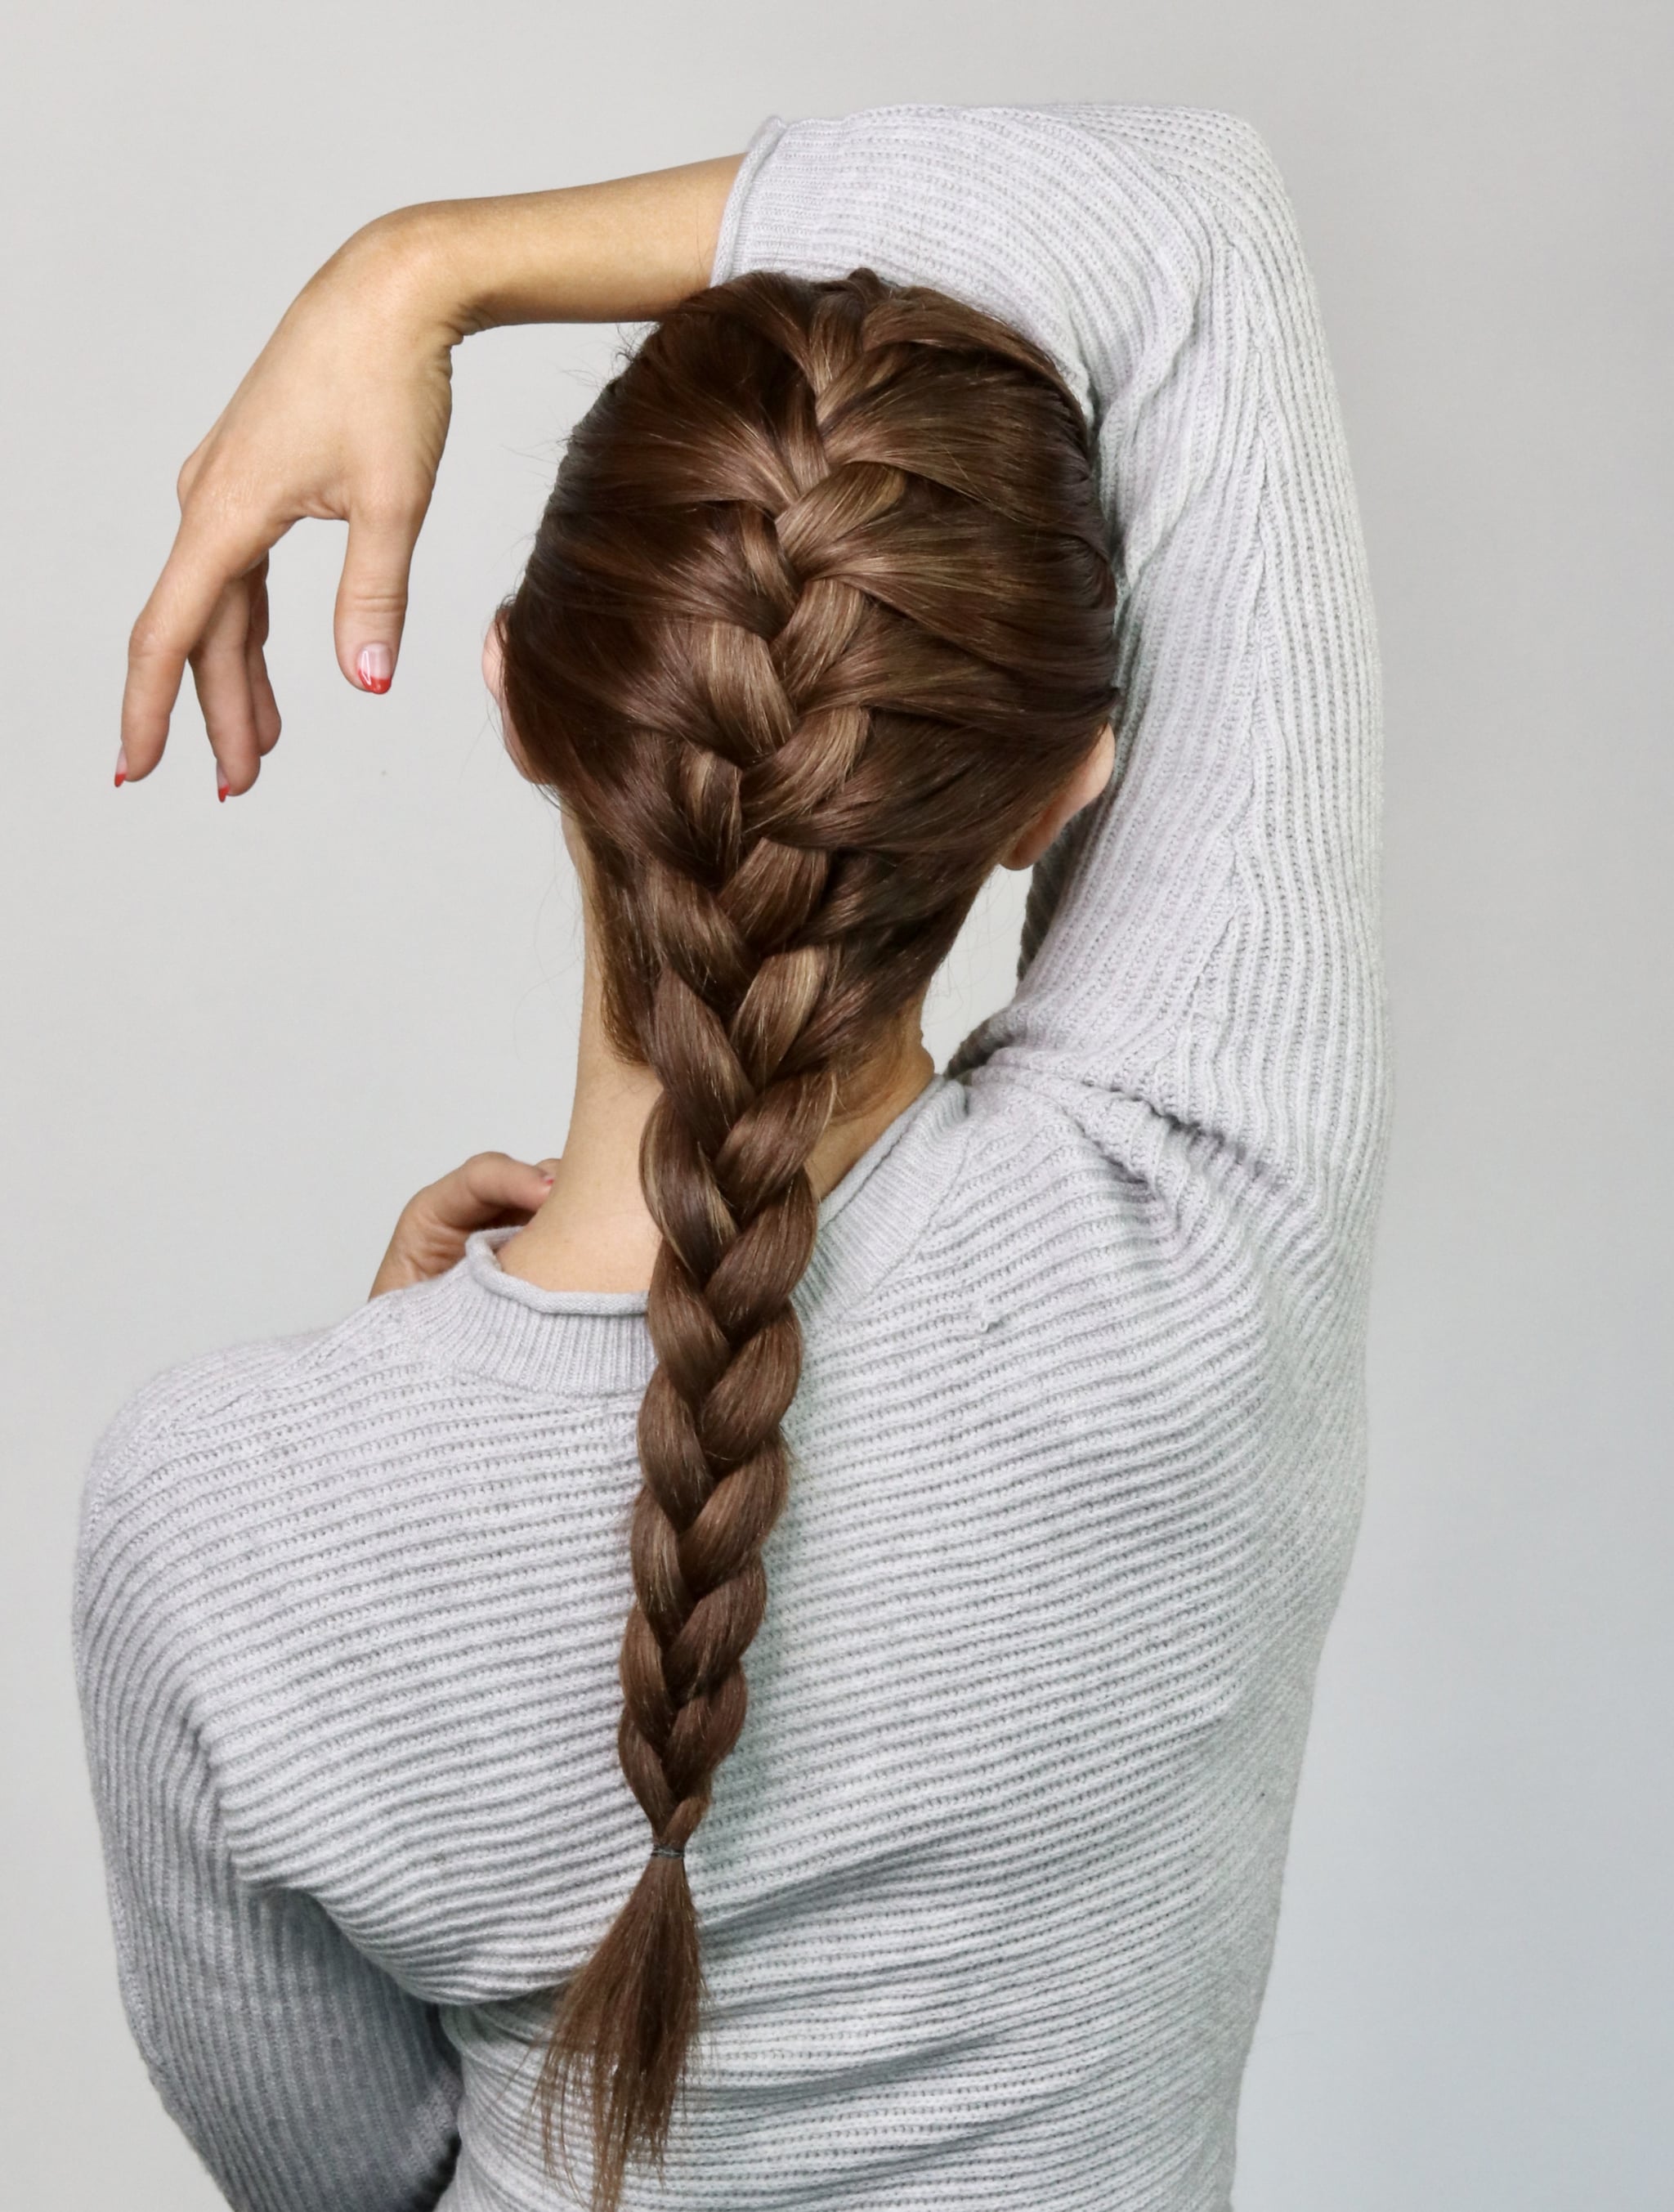
Learning the French Braid: A Smooth Style
The French braid is a little more involved than the classic braid. It creates a very smooth, elegant look because the braid lies flat against your head. This style is great for keeping hair completely out of your face. It looks very polished, and it is a popular choice for many events. It is a bit like the classic braid, but you add more hair as you go, you know.
To do a French braid, you start with a small section of hair at the top of your head. As you braid, you pick up small new sections of hair from the sides and add them to your existing strands. This makes the braid grow bigger as it moves down your head. It takes a little coordination to hold the strands and add new hair at the same time. But it is a very rewarding style to learn, so.
Step-by-Step: French Braid
1. **Start at the Top:** Begin by taking a small section of hair from the very top of your head, near your hairline. This section should be about two or three inches wide. Divide this small section into three equal strands, actually.
2. **Begin a Classic Braid:** Make one or two crosses of a classic three-strand braid. Cross the right strand over the middle. Then, cross the left strand over the new middle. This sets your basic pattern, you see.
3. **Add Hair from the Right:** Before you cross the right strand over again, pick up a small, new section of hair from the right side of your head. Add this new hair to your existing right strand. Now, cross this combined, thicker right strand over the middle strand, too.
4. **Add Hair from the Left:** Before you cross the left strand over, pick up a small, new section of hair from the left side of your head. Add this new hair to your existing left strand. Then, cross this combined, thicker left strand over the new middle strand, you know.
5. **Continue Adding and Braiding:** Keep repeating steps 3 and 4. Each time you cross a side strand over the middle, you add a new, small section of hair from that side. Try to keep the sections you add about the same size for an even braid, so.
6. **Finish the Braid:** Once you have added all the hair from your head, you will be left with three strands. At this point, simply continue braiding these three strands down to the end of your hair in a regular classic braid. Secure the end with a hair tie, actually.
Trying the Dutch Braid: The Raised Look
The Dutch braid is often called an "inside-out" French braid. Instead of crossing strands over the middle, you cross them under the middle. This makes the braid stand out from your head, giving it a very distinct, raised look. It is a bold and very stylish choice. Once you know how to French braid, learning the Dutch braid is a logical next step, you know. It uses the same idea of adding hair as you go, but with a different crossing direction, too.
This braid can feel a little different at first because of the under-crossing. But with a bit of practice, it becomes very natural. The raised look of the Dutch braid makes it really pop. It is a great option for a strong, visible braid. You can do one Dutch braid, two Dutch braids, or even four Dutch braids, as some people like to do. The possibilities are quite many, so.
Step-by-Step: Dutch Braid
1. **Start Your Section:** Just like with the French braid, take a small section of hair from the top of your head. Divide this section into three equal strands. This is your starting point, actually.
2. **Begin Under-Crossing:** This is where the Dutch braid is different. Take the right strand and cross it UNDER the middle strand. Then, take the left strand and cross it UNDER the new middle strand. You are going under, not over, you see.
3. **Add Hair from the Right (Under):** Before you cross the right strand under again, pick up a small, new section of hair from the right side of your head. Add this new hair to your existing right strand. Now, cross this combined, thicker right strand UNDER the middle strand, too.
4. **Add Hair from the Left (Under):** Before you cross the left strand under, pick up a small, new section of hair from the left side of your head. Add this new hair to your existing left strand. Then, cross this combined, thicker left strand UNDER the new middle strand, you know.
5. **Continue the Under-Crossing Pattern:** Keep repeating steps 3 and 4. Each time you cross a side strand under the middle, you add a new, small section of hair from that side. Keep your added sections even for a nice, smooth braid, so.
6. **Finish with a Classic Braid:** Once you have added all the hair from your head, you will have three strands left. Continue braiding these three strands down to the end of your hair in a regular classic braid, still crossing under if you want the raised look all the way. Secure the end with a hair tie, actually.
Making a Fishtail Braid: A Delicate Touch
The fishtail braid looks much more complicated than it actually is. It creates a very delicate, intricate pattern that looks like a fish's skeleton. This braid uses only two main sections of hair, but you take very small pieces from the outside of each section. It is a beautiful style that adds a lot of texture to your hair. It is a good choice for a softer, more romantic look, you know.
The trick to a good fishtail braid is to keep the strands you pull very thin. The thinner the strands, the more detailed and beautiful the braid will look. It takes a little bit of patience, but the result is truly worth the effort. You can do a fishtail braid on a ponytail, or you can start it higher up on your head, like a French or Dutch braid, too.
Step-by-Step: Fishtail Braid
1. **Prepare Your Hair:** First, brush your hair to make it smooth. Decide where you want your fishtail braid to start. You can gather all your hair into a ponytail first, or just work with a section of hair. Divide your chosen hair into two equal main sections, so.
2. **Take a Small Piece from the Right:** From the outside edge of the right main section, take a very small piece of hair. This piece should be about half an inch thick, or even smaller if you want a very fine braid. Make sure it is a clean, thin piece, you see.
3. **Cross it Over to the Left:** Take that small piece of hair you just pulled from the right. Cross it over the top of the right main section. Then, add it to the inside of the left main section. It is now part of the left section, actually.
4. **Take a Small Piece from the Left:** Now, from the outside edge of the left main section, take another very small piece of hair. Try to make it about the same size as the piece you took from the right side, you know.
5. **Cross it Over to the Right:** Take that small piece of hair from the left. Cross it over the top of the left main section. Then, add it to the inside of the right main section. It is now part of the right section, too.
6. **Repeat the Pattern:** Continue repeating steps 2 through 5. You will keep taking a small piece from the outside of one main section, crossing it over, and adding it to the inside of the other main section. Keep your tension even and your pieces small for the best result, so.
7. **Secure the End:** Braid all the way down to the end of your hair. When you cannot braid any further, secure the end with a hair tie or an elastic band. You can gently pull on the sides of the braid to make it look fuller and more relaxed, if you like, you see.
Trying a Rope Braid: A Simple Twist
The rope braid is a very simple and quick braid to do. It uses only two strands of hair, which you twist together. This braid looks very neat and elegant, and it is great for when you want a braided look without too much fuss. It is a good option for holding back bangs or for a quick side braid. This braid is also a good foundation for more complex updo styles, you know.
The key to a good rope braid is to twist each strand tightly before you twist them together. This helps the braid stay put and look defined. If the strands are not twisted enough, the braid might unravel easily. It is a fun and easy braid to add to your hairstyle skills, too.
Step-by-Step: Rope Braid
1. **Prepare Your Hair:** First, brush your hair to make it smooth. Gather the section of hair you wish to braid. You can start with a ponytail, or just a section from the side of your head. Divide this section into two equal strands, so.
2. **Twist the First Strand:** Take the right strand of hair. Begin to twist it tightly in one direction, for example, clockwise. Keep twisting it until it feels firm and coiled. You want it to hold its shape, you see.
3. **Twist the Second Strand:** Now, take the left strand of hair. Twist it tightly in the SAME direction as the first strand (e.g., clockwise). It is important that both strands are twisted in the same way, actually.
4. **Twist the Strands Together:** Once both individual strands are tightly twisted, you will twist them together. To do this, take the right twisted strand and cross it OVER the left twisted strand. Then, twist them together in the OPPOSITE direction of your initial twists (e.g., counter-clockwise), you know.
5. **Continue Twisting:** Keep twisting the two combined strands together down the length of your hair. Make sure to maintain the individual twists within each strand as you go. This helps the rope braid stay neat and tight, too.
6. **Secure the End:** When you reach the end of the hair, secure the rope braid with a hair tie or an elastic band. If you do not secure it, the twists might unravel. This finishes your rope braid, so.
Caring for Your Braided Hair
Keeping your braided hair looking good means a little care. Braids can stay neat for a while, but they also need attention. When you have braids, it is a good idea to use a gentle shampoo. Focus on your scalp when washing. Rinse your hair very well to get rid of all product. This helps keep your scalp clean, you know.
After washing, let your braids air dry if you can. If you use heat, use a low setting. This prevents damage to your hair. You can also use a light leave-in conditioner or a hair oil. Apply it to the length of your braids. This helps keep your hair soft and shiny, actually. For more general hair care tips, you can learn more about hair health on our site.
To keep your braids fresh between washes, you can use a dry shampoo on your scalp. This helps with any oiliness. Sleeping on a satin or silk pillowcase is also a good idea. It reduces rubbing and helps keep your braids from getting frizzy. This simple step makes a big difference in how long your braids look nice, so. Also, for other hair styles, you can link to this page hair styling tips.
If you notice any loose strands, you can use a little hairspray or a small amount of gel to smooth them down. Do not pull on your braids too much. This can cause breakage. When you are ready to take your braids out, be very gentle. Take your time to undo each section. Use a wide-tooth comb to detangle your hair afterwards. This prevents damage and keeps your hair healthy, too. You can find more helpful advice on a reputable hair care site, for example, by looking up general hair care practices.
Frequently Asked Questions About Braiding
Here are some common questions people ask when they want to learn how to braid hair:
How do you braid your own hair easily?
To braid your own hair easily, start with the classic three-strand braid. Practice on a ponytail first. Use a mirror, and make sure your hair is brushed smooth. Keep your sections even, and do not hold them too tightly. Patience is very important, you know. With a little practice, it gets much easier.
What are the basic steps for braiding hair?
The basic steps for braiding hair involve dividing your hair into sections, usually three. Then, you cross the outside sections over or under the middle section, one at a time. You repeat this pattern down the length of your hair. Finally, you secure the end with a hair tie. That is the very simple idea, actually.
How do I keep my braids neat?
To keep your braids neat, use a light styling product before you start. Sleep on a satin or silk pillowcase to reduce frizz. You can use a little hairspray or gel on any flyaways. Avoid touching your braids too much during the day. This helps them stay looking fresh for longer, so.

Detail Author:
- Name : Minerva Dibbert
- Username : mccullough.lavonne
- Email : jeramy20@hayes.com
- Birthdate : 1993-06-08
- Address : 9198 Justus Parkway Brekkeport, VA 84617
- Phone : +1.513.322.8515
- Company : Okuneva-Goldner
- Job : Operating Engineer
- Bio : Qui voluptates eos adipisci rerum quis porro. Aliquid ducimus doloribus ut ut velit. Doloremque ipsum itaque sit est libero.
Socials
twitter:
- url : https://twitter.com/lraynor
- username : lraynor
- bio : Quas voluptas ea temporibus tempore. Qui sunt facere ut qui. Minima et dolore est ratione fugit est.
- followers : 3261
- following : 885
linkedin:
- url : https://linkedin.com/in/lawson_real
- username : lawson_real
- bio : Est qui similique quasi possimus nihil.
- followers : 4680
- following : 514
