
Have you ever felt a little stuck when trying to draw the hands? You are definitely not alone, so many artists find this part of the human form quite challenging. Hands, with all their intricate movements and subtle expressions, really do add so much life and feeling to any character or scene. Getting them just right can sometimes feel like a puzzle, but it is certainly a skill anyone can learn with a bit of practice and the right approach.
It's interesting, isn't it, how something we use every single day can seem so complex when we try to put it down on paper, or rather, on a digital canvas? From holding objects to making grand gestures, hands tell a story all their own. They can show age, emotion, and even personality, which is why learning to draw them well is such a valuable thing for anyone who enjoys making art.
This guide is here to help you get a better handle on drawing these amazing parts of the body. We will look at some simple ways to break down their structure, and you know, explore how digital tools can actually make the whole process a bit easier and more fun. So, if you're ready to add more depth to your artwork, let's get started on understanding how to draw the hands with confidence!
Table of Contents
- Why Hands Are a Drawing Challenge
- Starting with Digital Tools for Hands
- Tips for Practicing Draw the Hands Often
- Making Your Hand Art Ready to Share
- Frequently Asked Questions About Drawing Hands
Why Hands Are a Drawing Challenge
For many artists, tackling hands feels like a real hurdle, and you know, there are some good reasons for that. Hands are incredibly flexible, and they have so many small bones and muscles. This means they can take on countless shapes and positions, which, frankly, makes them tough to simplify into a drawing. It's not like drawing a simple sphere or cube, is that?
Another thing is that hands are almost always in motion, or they are holding something, or they are expressing something. This constant change means you rarely see them in a static, easy-to-copy pose. Plus, the way light hits the knuckles and folds can make them look quite different from one moment to the next. So, it's pretty understandable why folks find them a bit of a puzzle to get right.
But, you know, with a little patience and a method for breaking things down, anyone can get better at this. It really just takes understanding a few core ideas about how hands are built and how they move. We can start by looking at them not as complex structures, but as a collection of simpler forms, which, you know, makes it a lot less intimidating.
Seeing Basic Shapes
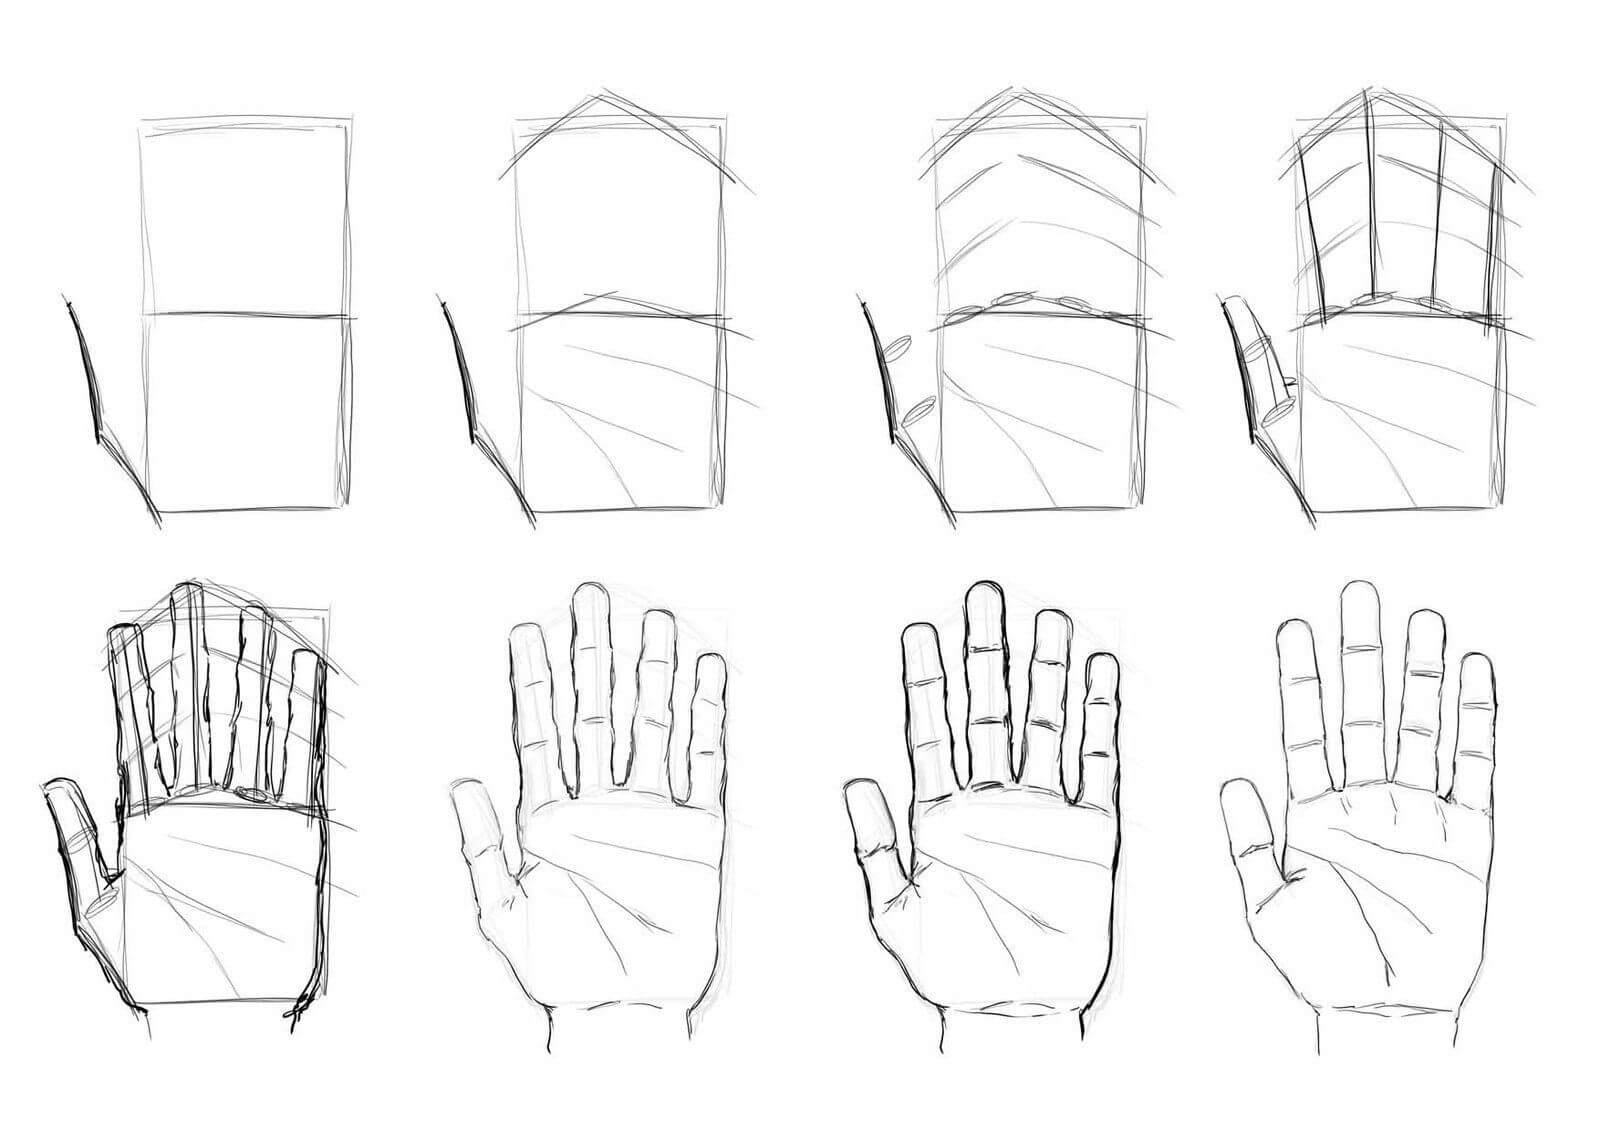
When you first try to draw the hands, it helps a lot to think of them as a collection of basic shapes. Don't try to draw every single finger and knuckle right away. Instead, you could start with a simple block for the palm, kind of like a slightly squashed box or a wedge. This initial shape gives you a solid foundation to build upon, and it helps you get the overall size and angle correct.
Then, for the fingers, think of them as cylinders or even just simple tubes. Each segment of the finger, you know, from the knuckle to the tip, can be seen as a small cylinder. This way, you are not trying to draw a perfect finger immediately, but rather building it up from easier forms. The thumb, too, has its own distinct blocky shape where it connects to the palm, which is a bit different from the other fingers.
By breaking the hand down into these simpler geometric shapes, you can focus on getting the proportions and perspective right before worrying about the finer details. This approach, honestly, makes the whole process much more manageable and less overwhelming. It's a bit like building with blocks before you add the fancy paint, you know?
A Look at Hand Anatomy
Understanding a little bit about hand anatomy can really help when you draw the hands, but you don't need to become a doctor, thankfully! Just knowing the main bone groups and how they connect can make a big difference. Think about the wrist bones, then the long bones in the palm (metacarpals), and then the finger bones (phalanges).
The palm is basically one big, somewhat flat area, and the fingers attach to it. Each finger, except the thumb, has three sections, or three bones, and the thumb has two. These connections, where the bones meet, are your knuckles. Knowing where these main joints are helps you understand how the hand bends and moves. It's pretty straightforward once you see it, actually.
Also, consider the muscles and tendons. You can see them as subtle bumps and curves, especially on the back of the hand and around the thumb. These aren't something you need to draw perfectly at first, but being aware of them helps you add a natural look to your hand drawings. It's all about getting a feel for the structure underneath, which, you know, makes the surface look more believable.
Starting with Digital Tools for Hands
Drawing hands can feel a bit less daunting when you use digital tools, especially if you are just starting out. Free online drawing applications, like the one mentioned in My text, offer a lot of flexibility that traditional paper might not. You can easily undo mistakes, which is a big relief, and you can use layers to build up your drawing step by step, which is rather helpful.
These applications often come with various brushes and tools that can mimic different drawing styles, too. You can sketch with a pencil tool, then ink with a pen tool, and even add color or shading with different brushes. This means you can experiment quite a bit without wasting materials, and that is a pretty nice perk, honestly. It's a great way to learn and try new things.
Plus, many digital drawing tools let you zoom in really close to work on small details, like the lines on the palm or the fingernails, and then zoom out to see the whole hand in context. This kind of control can really speed up your learning process. You can learn more about digital art tools on our site, and see how they can make drawing more accessible.
Using Simple Forms to Build Your Hand
When you're working digitally, you can really lean into the "basic shapes first" idea. Start a new layer for your rough sketch. On this layer, just draw those simple blocks for the palm and cylinders for the fingers. Don't worry about making it neat; this is just your guide. You can, you know, use a light, sketchy brush for this part, something that feels like a pencil.
Once you have your basic shapes in place, you can lower the opacity of that sketch layer. Then, create a new layer on top. On this new layer, you can start to refine your shapes, drawing over your initial sketch. This is where those cylinders become more like actual fingers, and your palm block starts to look more like a hand's base. It's a very forgiving way to work, honestly.
You can adjust the size and position of your shapes easily, too, which is a huge advantage. If a finger looks too short, you can select it and stretch it a bit. If the palm is too wide, you can narrow it. This kind of flexibility makes it much easier to correct mistakes and experiment with different hand poses without having to start all over again, which is, you know, pretty great.
Adding Details and Feeling
After you have the main structure of your hand down, it is time to add the details that bring it to life. On yet another new layer, you can start to draw the knuckles more clearly, and perhaps define the creases in the palm. Think about the subtle curves and bumps that show where muscles and tendons are, especially on the back of the hand and around the base of the thumb.
Fingernails are a small detail, but they really help to ground the hand in reality. They have a specific shape, usually a bit curved, and they follow the form of the fingertip. Pay attention to how they sit on the finger, not just as flat shapes. Also, consider the slight wrinkles on the knuckles and the pads of the fingers. These small lines add a lot of character, you know.
The real feeling in a hand drawing comes from its pose and how it interacts with its surroundings. Is it clenched in a fist, gently holding something, or reaching out? Think about the story the hand is telling. The way the fingers curl, the tension in the palm, or the relaxed spread of the digits all contribute to the emotion. It's pretty amazing how much a hand can express, actually.
Tips for Practicing Draw the Hands Often
Like any skill, getting better at drawing hands just takes practice, and you know, lots of it. But it's not just about drawing hands over and over again without thinking. It's about smart practice, observing, and understanding what you're seeing. The more you engage with the subject, the more natural it will become, which is definitely true for almost any art skill.
One very effective way to practice is to set small, achievable goals. Maybe one day you focus only on drawing fists, and the next day you try open palms. Breaking it down like this makes it less overwhelming and helps you concentrate on specific aspects of the hand. It's a bit like learning a musical instrument, you know, you practice scales before you play a whole song.
And remember, it's okay for your early attempts to not be perfect. Every artist, even the very best ones, started somewhere. The goal is to learn from each drawing, not to create a masterpiece every time. Just keep at it, and you will see improvement, that is for sure. Consistency, honestly, is key here.
Watching Real Hands
One of the best resources you have for learning to draw the hands is, well, your own hand! Or the hands of people around you. Spend some time just observing. Watch how your fingers bend when you pick up a cup, or how your hand rests when you are typing. Notice the subtle shifts in form when you clench your fist versus when you relax your palm.
You can also use a mirror or take photos of your own hand in different poses. This gives you a static reference that you can study closely. Try holding an object, or making a specific gesture, and then draw it. Pay attention to the shadows and highlights, and how they define the shape of the hand. This direct observation is incredibly valuable, honestly, it really is.
Don't just draw what you *think* a hand looks like; draw what you *see*. This might sound simple, but it's a big shift in mindset for many artists. Your brain often tries to simplify things, but real hands have so many interesting quirks and details that make them unique. So, you know, really look closely, that's the main idea here.
Sketching Many Different Poses
To truly get a feel for how to draw the hands, you need to sketch them in a wide variety of poses. Don't just stick to the easy ones. Challenge yourself! Try drawing hands holding different objects, from a small coin to a large book. Draw hands that are pointing, waving, resting, or in mid-action. The more variety you tackle, the better your understanding will become.
Quick gesture sketches are also incredibly useful. Spend just 30 seconds or a minute on each hand pose, trying to capture the overall flow and feeling rather than every detail. This helps you loosen up and focus on the big picture, which is, you know, very important. It trains your eye to see the main lines of action and the general form quickly.
You can find lots of reference photos online, too, if you need inspiration or specific poses. Websites dedicated to art references often have entire sections just for hands. Use these as a starting point, but always try to draw from life when you can. It's a bit like learning to cook from a recipe versus learning by experimenting in the kitchen; both are good, but one gives you more direct experience. For more insights on hand drawing basics, you might find this external resource helpful: Art Reference Hand Drawing Basics.
Making Your Hand Art Ready to Share
Once you feel good about your hand drawings, you will probably want to share them with others, or use them in bigger projects. This is where a free online drawing application really shines. As mentioned in My text, you can create digital artwork and then export it to popular image formats like JPEG, PNG, SVG, and PDF, which is pretty convenient.
This means your hand drawings can easily become part of social media posts, digital ads, or even printed on paper or apparel. The ability to export in various formats gives you a lot of freedom for what you do with your art. It's not just stuck on your computer; you can make it accessible to everyone, which is, you know, a big part of why many people create art.
So, whether you are making a quick sketch of a hand for a character or designing something for a business card, these tools make it simple to get your work out there. You can explore our drawing application further to see how easy it is to create, edit, and share your hand drawings and other art: explore our drawing application. It's a very versatile tool for artists of all kinds, honestly.
Frequently Asked Questions About Drawing Hands
Why are hands so hard to draw?
Hands are often tough to draw because they have many small bones and muscles, making them very flexible. This means they can take on countless different shapes and positions, which, you know, makes them tricky to simplify and draw accurately from memory or even from a quick glance.
What is the easiest way to draw hands?
The easiest way to start drawing hands is to break them down into basic shapes first. Begin with a simple block for the palm and cylinders for the fingers. Build up the form from these simple shapes before adding any fine details. This approach makes the process much more manageable, honestly.
Should I draw bones first when drawing hands?
You don't need to draw every single bone, but understanding the main bone groups can really help. Knowing where the wrist, palm, and finger bones are helps you understand how the hand bends and moves. It's more about knowing the underlying structure rather than drawing a detailed skeleton, which, you know, makes a big difference.


Detail Author:
- Name : Eino Hickle
- Username : pheller
- Email : moriah14@zieme.com
- Birthdate : 1982-04-30
- Address : 45331 Dare Expressway East Cristinachester, AR 30202
- Phone : 239.764.0094
- Company : Toy LLC
- Job : Engineering
- Bio : Iure non sint consequuntur enim sunt. Nihil velit aut nostrum architecto quibusdam alias. Ea ratione ut laborum itaque quam eius.
Socials
linkedin:
- url : https://linkedin.com/in/beverlywisoky
- username : beverlywisoky
- bio : Doloribus dolor explicabo tenetur eligendi.
- followers : 6687
- following : 771
tiktok:
- url : https://tiktok.com/@wisoky1989
- username : wisoky1989
- bio : Et deleniti quo et ab eaque maiores. Debitis nemo sed qui omnis reprehenderit.
- followers : 930
- following : 1156
facebook:
- url : https://facebook.com/wisoky2006
- username : wisoky2006
- bio : In et dolorum molestiae cumque. Eos ut tenetur odio.
- followers : 1215
- following : 2792
twitter:
- url : https://twitter.com/beverly.wisoky
- username : beverly.wisoky
- bio : Voluptatibus dolorum nihil excepturi quas iure. Et et et aut nam. Quisquam est vel rerum.
- followers : 6616
- following : 754
instagram:
- url : https://instagram.com/beverlywisoky
- username : beverlywisoky
- bio : Et laboriosam animi sit modi blanditiis sit. Commodi et ex magnam qui soluta dolor.
- followers : 4000
- following : 2667
