
There’s just something so wonderful about a perfectly put-together braid, isn't there? It’s a classic look, really, that never seems to go out of style. Braids are a truly fantastic way to keep your hair looking neat and tidy, especially when you are busy, and they also add a very fun, pretty touch to your everyday appearance. It’s a simple technique, this weaving, that you can use for many things, like hair, or even ribbons and flowers, too.
Braiding your hair, you know, can actually save you quite a bit of time in your daily routine. And, as a bonus, it helps you create a hairstyle you can show off with confidence. Whether you are running errands, heading to your workplace, or perhaps going to the gym for a workout, braids offer a really cool way to make your look a bit more interesting and keep your hair feeling fresh, which is quite nice.
This article, you see, is here to give you an easy-to-follow guide for braiding hair. We will go over the basics, and then we will also learn how to create a French braid and a Dutch braid. You will get to learn how to braid your own hair, perhaps for the very first time. We will cover the fundamental steps of braiding and then get in some good practice. So, pull up a mirror, and let's get started, shall we? This is for anyone, whether you are completely new to braiding or just want to refresh what you already know.
Table of Contents
- The Basics of Braiding
- Taking it Up a Notch: French Braids
- The Inside-Out Look: Dutch Braids
- Tips for Braiding Success
- Frequently Asked Questions About Braiding
The Basics of Braiding
Before you get into the more complex styles, it is really helpful to understand the very fundamental idea of braiding. At its core, braiding is about taking separate strands of something and weaving them together in a specific pattern. For hair, this typically means three sections, but you can, of course, use more. It’s like a little dance for your hair, you know, where each piece takes its turn. This foundational skill is quite important, as it helps build the confidence you need for more elaborate looks later on. So, let’s get a good handle on this first, and everything else will start to feel a bit more natural, really.
Gathering Your Tools
To start, you will want to have a few simple things ready. You probably have most of these lying around your home already, which is pretty convenient. First, a good comb or a brush is quite essential. This helps you get all the tangles out of your hair, which makes the whole braiding process much smoother. You really do not want to be fighting knots while you are trying to create a nice, even braid. Next, you will need some hair ties or elastics. These are for securing the end of your braid, so it stays put. Clear ones are often a good choice because they blend in, but any color will work just fine. Some people also like to have a spray bottle with water nearby, just to dampen the hair a little if it is feeling too dry or flyaway. And, of course, a mirror is quite important, so you can see what you are doing, especially when you are braiding the back of your head. Having everything within reach just makes the experience much more pleasant, you know?
Getting Ready to Braid
Preparation is, honestly, a really big part of getting a good braid. It is not just about the weaving itself. First things first, you want to make sure your hair is completely free of any knots or tangles. So, take your time and gently brush or comb through it from the ends all the way up to your roots. This step, you will find, is super important for a smooth braid, as knots can really mess up your flow and make the braid look uneven. Next, decide where you want your braid to start. For a classic braid, this usually means gathering all your hair at the back of your head, or perhaps to one side. You might want to use a little bit of a smoothing product, like a light hair oil or a cream, if your hair tends to be a bit frizzy. This can help keep those stray hairs in line and give your braid a really polished appearance. It is also a good idea to work with hair that is either completely dry or just slightly damp. Very wet hair can be harder to manage and might not hold the braid as well. So, once your hair is smooth and ready, you can take a deep breath and prepare to start sectioning. This preparation, in a way, sets you up for success, and it really does make a difference in the final look.
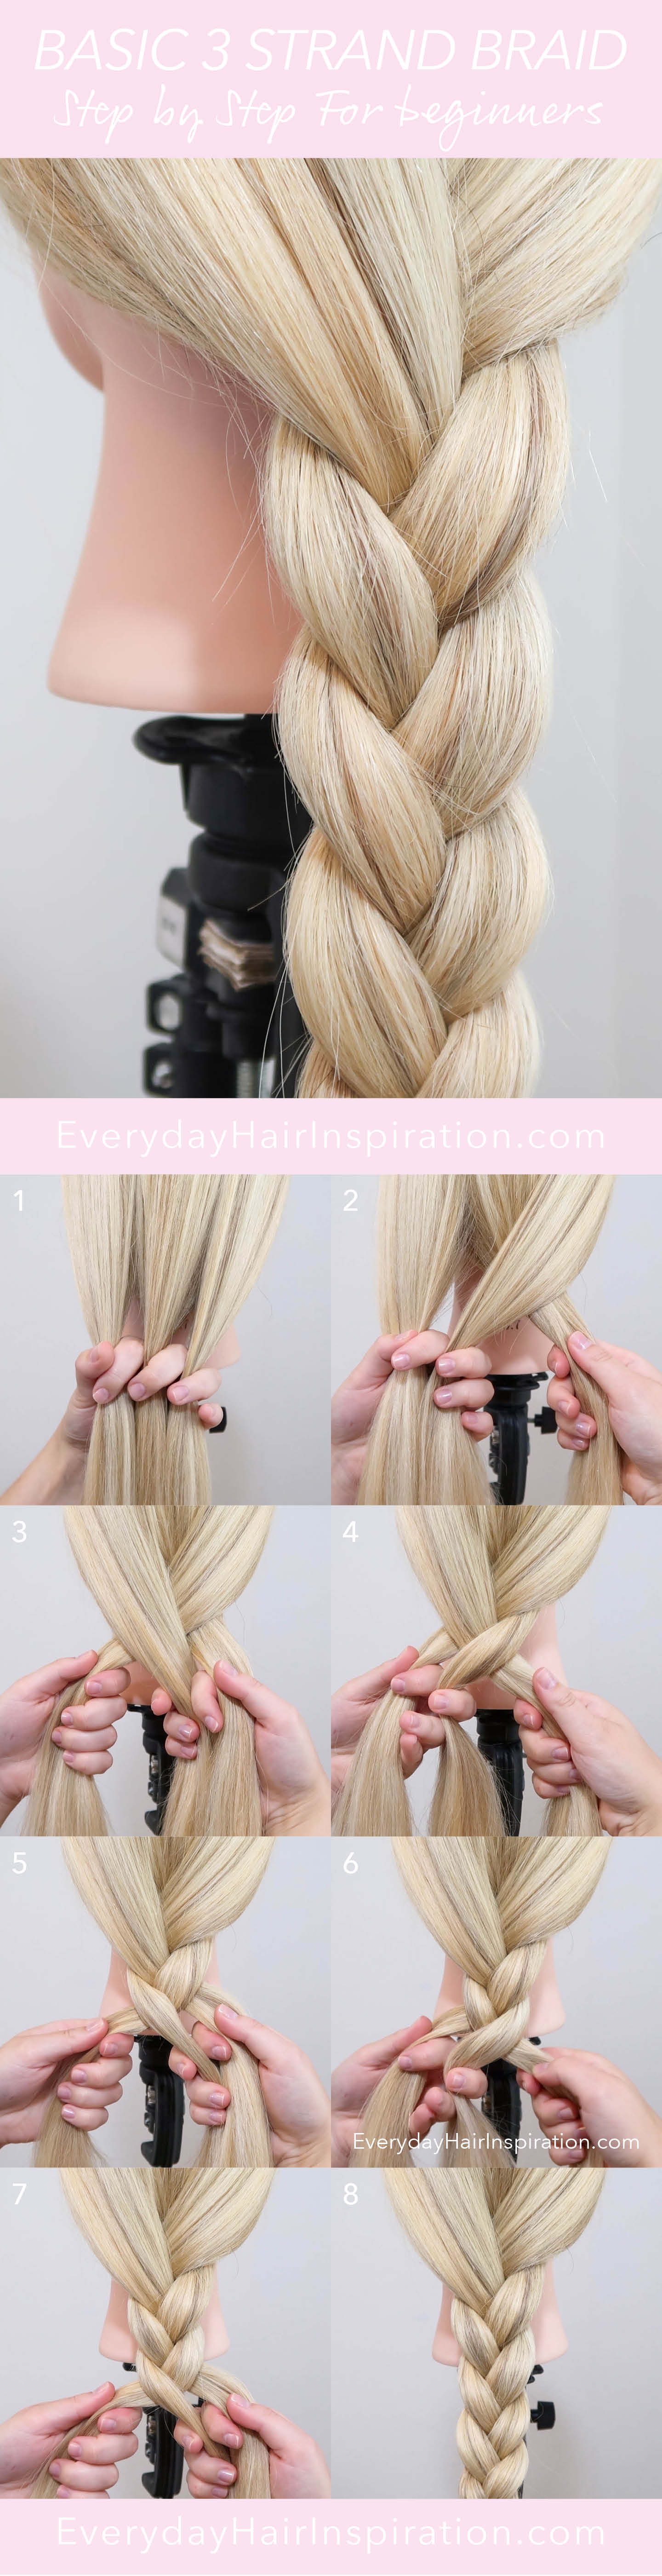
The Classic Three-Strand Braid
This is where it all begins, really, the foundation of so many other styles. Once your hair is brushed and ready, you will want to gather the section of hair you plan to braid. For a simple braid, this could be all of your hair pulled to one side, or perhaps just a smaller section from the back. Now, the key step here is to divide that section of hair into three equal parts. Try to make them as even as you can, because this really helps the braid look uniform and neat. You can hold one section in your left hand, one in your right hand, and let the middle section just hang for a moment, or perhaps hold it gently with a finger.
Okay, so now you have your three sections. Let's call them Left, Middle, and Right. The first move is to take the Left section and cross it over the Middle section. So, the Left section now becomes the new Middle section, and the old Middle section is now on the left side. It's a bit like a dance, you know, where they swap places. Make sure to keep a good, consistent tension on the hair as you do this. If it is too loose, your braid will look floppy; too tight, and it might pull uncomfortably. A medium, firm grip is usually best, actually.
Once you have done that, it's time for the other side. You will take the Right section and cross it over the new Middle section. Again, the Right section now becomes the very center, and the old Middle section moves to the right. You are essentially always bringing an outer strand into the middle position. This is the repetitive part of the braid, and it is what creates that lovely woven pattern. You might find it a little awkward at first, holding all three strands and trying to keep them separate, but with a bit of practice, it really does become second nature.
You just keep repeating these two steps: cross the leftmost strand over the middle, then cross the rightmost strand over the middle. Just keep going, all the way down the length of the hair you want to braid. Try to maintain that consistent tension throughout, from the top of the braid right down to the very end. This helps create a really smooth, even appearance. When you get to the end of the hair, where it starts to taper off, you will want to secure your braid. Use a hair elastic or a hair tie to fasten it firmly. You can double-wrap it if you need to, just to make sure it stays put. And there you have it, your very first classic three-strand braid! It's a rather simple process once you get the hang of it, and it's the basis for so much more.
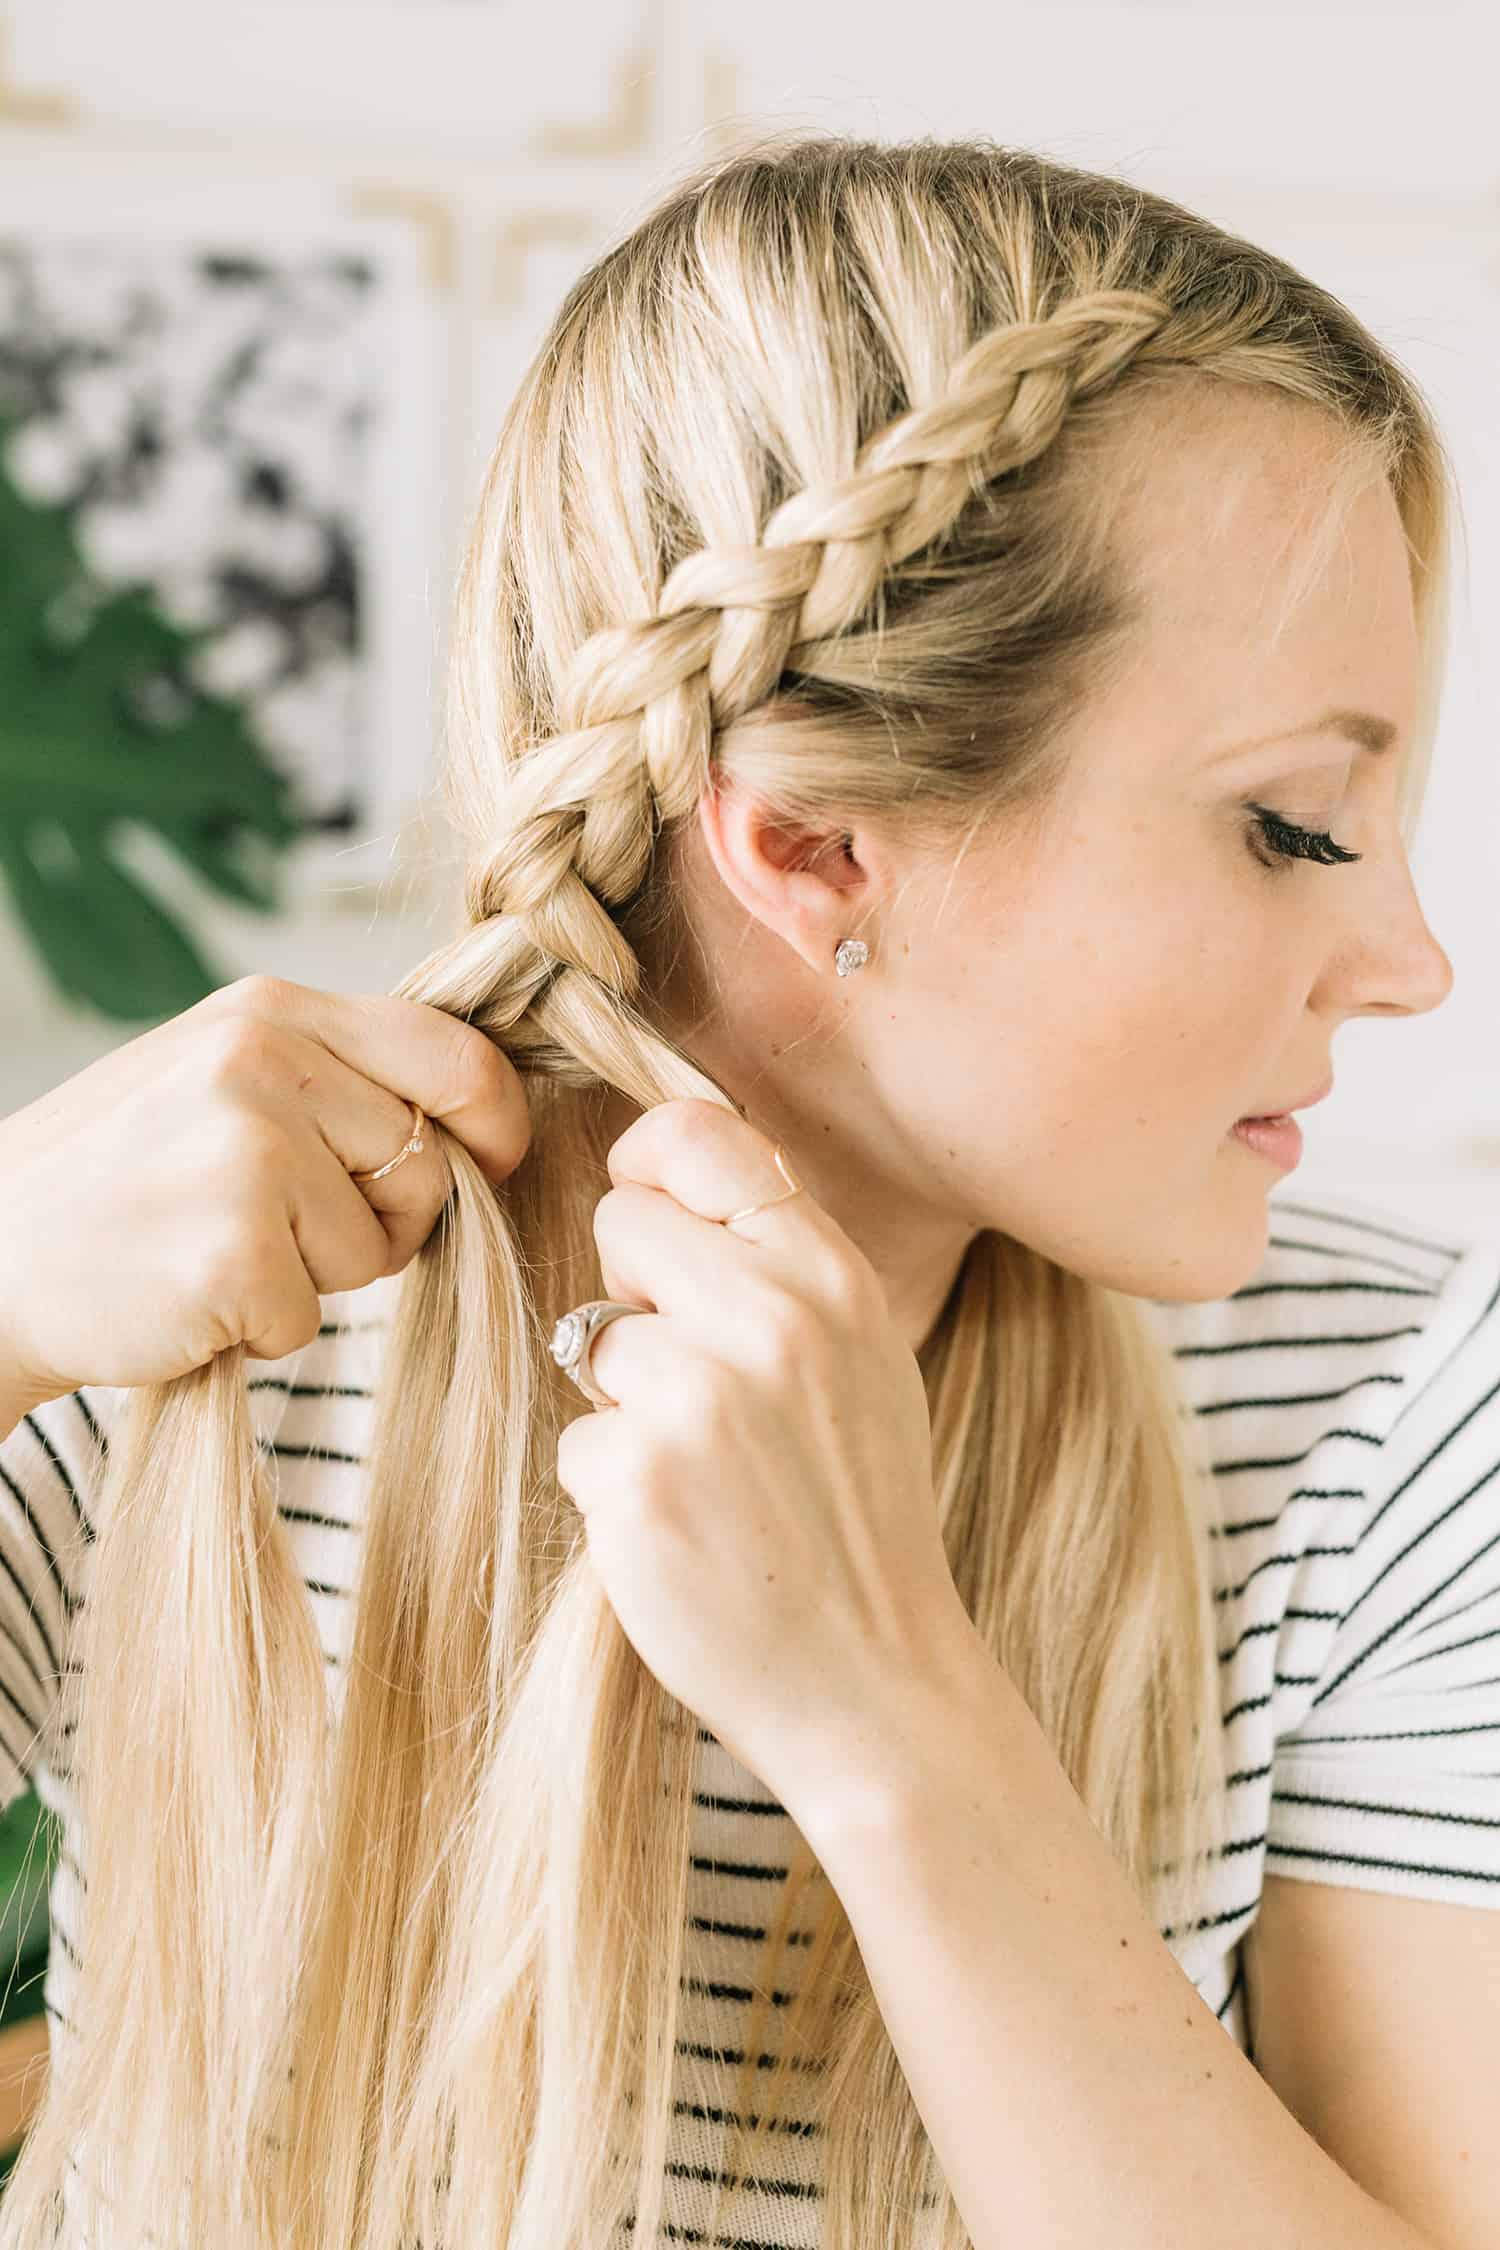
Taking it Up a Notch: French Braids
Once you feel pretty comfortable with the basic three-strand braid, you are ready to try something a little more involved, but still incredibly classic and beautiful: the French braid. This style has a lovely, flowing look because it starts right at the top of your head and gradually incorporates more hair as you go down. It's a really elegant way to keep hair out of your face and create a polished appearance. Many people, you know, find this one to be a bit of a challenge at first, but with a little patience, it becomes quite manageable. It is just about adding hair as you go, which is the main difference.
What Makes a French Braid Different?
The main thing that sets a French braid apart from a regular three-strand braid is how you start and how you continue to add hair. Instead of just dividing a section of hair into three at the beginning and braiding it down, with a French braid, you actually start with a smaller section of hair right at the crown of your head. Then, as you weave the strands, you pick up small, new sections of hair from the sides and add them into your main braiding strands. This creates that lovely, integrated look where the braid seems to grow out of your head. It is a very smooth and continuous appearance, which is quite appealing. This technique, you will find, makes the braid lie flat against the scalp, which is really different from a regular braid that just hangs freely. So, it is all about that gradual addition of hair, really, which makes it feel a bit more intricate.
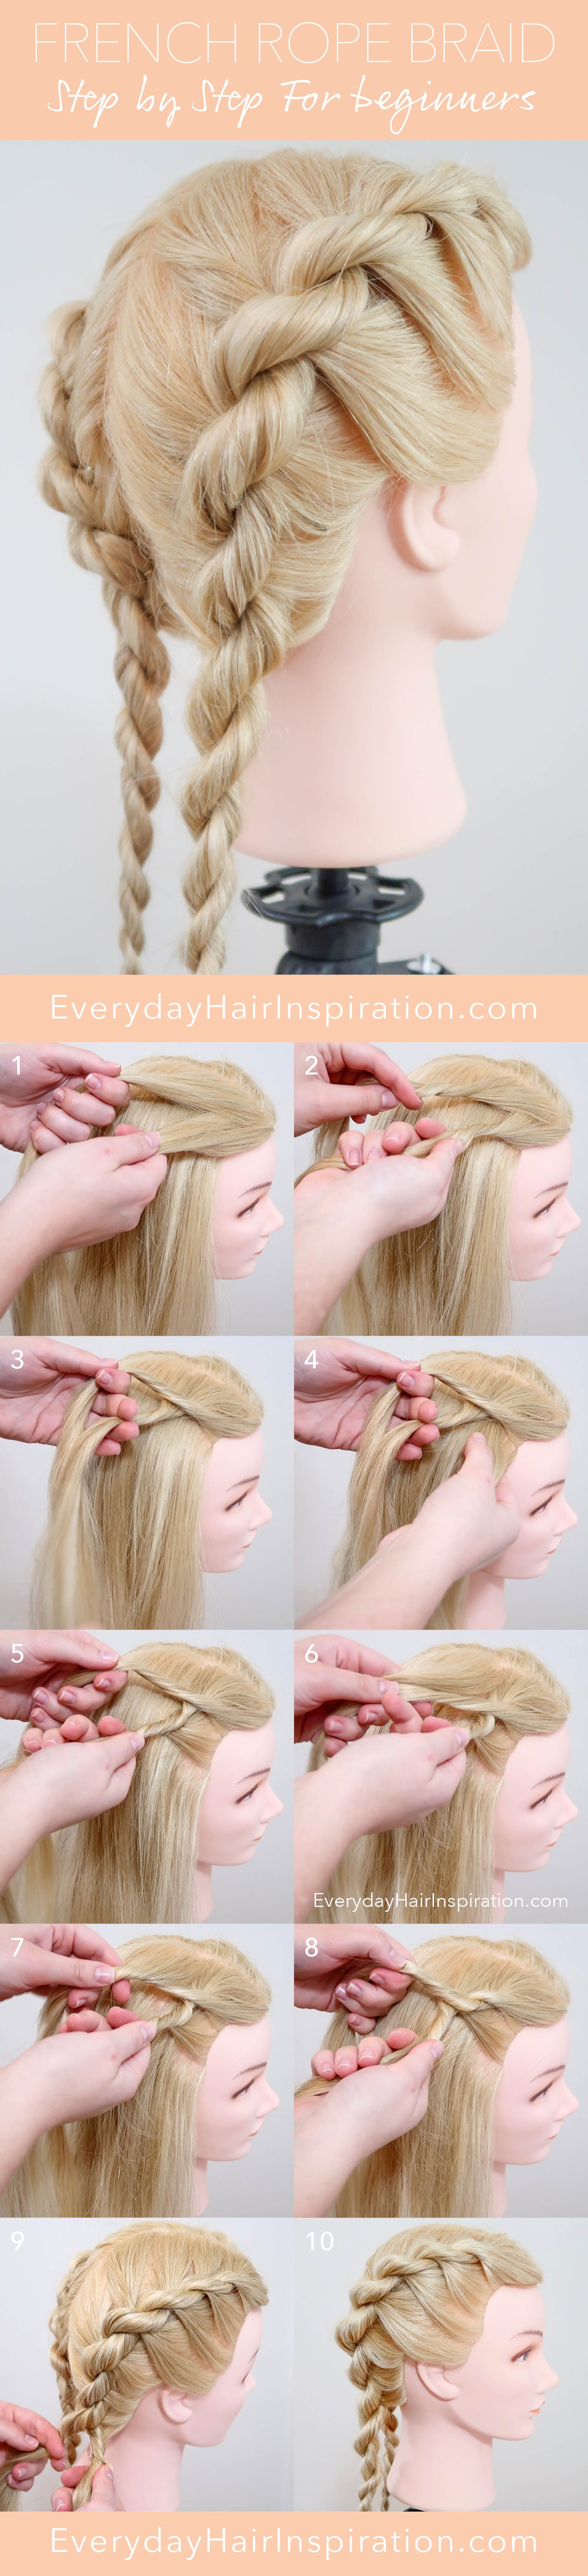
French Braid Steps
Alright, let's get into the steps for creating a beautiful French braid. This might feel a little tricky at first, especially trying to reach the back of your head, but honestly, it gets much easier with practice. First, you will want to take a section of hair from the very top of your head, right at the crown. This should be a relatively small section, perhaps about two to three inches wide, depending on how thick your hair is. Divide this initial section into three equal strands, just like you would for a regular braid. Let's call them Left, Middle, and Right again.
Now, you will begin with a single pass of a regular braid. Cross the Left strand over the Middle strand. Then, cross the Right strand over the new Middle strand. So far, it is just like the basic braid, really. This sets up your pattern. This is where the French braid magic happens. Before you make your next cross, you will add new hair. Take the strand that is now on the left side (it was originally the Left strand, or the old Middle strand, depending on your perspective), and before you cross it over the current Middle strand, pick up a small, new section of hair from the hair that is loose on the left side of your head. Add this new section to your left strand, making it a bit thicker. Then, cross this combined, thicker Left strand over the Middle strand. It's like you're gathering little bits of hair as you go, you know?
You will do the same thing on the other side. Take the strand that is now on the right side. Before you cross it over the current Middle strand, pick up a small, new section of hair from the loose hair on the right side of your head. Add this new section to your right strand, making it thicker. Then, cross this combined, thicker Right strand over the Middle strand. You are essentially repeating this pattern: take an outer strand, add a new section of loose hair to it, and then cross that combined strand over the middle. Keep doing this, moving down your head, picking up new sections of hair from the sides each time. Try to keep the sections you add consistent in size, as this helps keep the braid looking even and smooth. It is a bit of a rhythm, you see, once you get into it.
Continue this process until you have incorporated all the loose hair from the sides of your head into the braid. At this point, you will have gathered all your hair into three main sections. From here on, you simply continue with a regular three-strand braid all the way down to the ends of your hair. Secure the end with a hair elastic. And there you have it, a beautiful French braid! It might take a few tries to get the hang of adding the hair smoothly and keeping the tension even, but it is definitely a skill worth learning, and it looks pretty impressive, too.
The Inside-Out Look: Dutch Braids
If you have mastered the French braid, then you are in a really good spot to try the Dutch braid. This style is often called an "inside-out" braid or a "reverse" braid because, instead of the strands lying flat against your head like in a French braid, they actually stand out, creating a raised, almost three-dimensional effect. It looks incredibly intricate, but honestly, the technique is very similar to the French braid, with just one key difference. It is a very striking look, you know, and can add a lot of visual interest to your hairstyle. It is pretty cool how just a small change can make such a big impact.
Dutch Braid vs. French Braid
The core difference between a Dutch braid and a French braid is all about whether you cross the strands over or under each other. In a French braid, you always cross the outer strands *over* the middle strand. This makes the braid lie flat and integrated into your hair. With a Dutch braid, however, you do the exact opposite. You cross the outer strands *under* the middle strand. This simple change is what makes the braid pop out from your head, giving it that distinct, raised appearance. It's a rather subtle shift in movement, but it totally changes the final look. So, while the steps for adding hair are pretty much the same, that "under" motion is what gives the Dutch braid its unique character. It is almost like you are creating a little rope on top of your hair, which is quite interesting.
How to Create a Dutch Braid
Let's get to braiding that amazing Dutch style! Just like with the French braid, you will start by taking a section of hair from the top of your head, near your forehead. Again, make it a manageable size, about two to three inches wide, depending on your hair's thickness. Divide this initial section into three equal strands. We'll still call them Left, Middle, and Right, just to keep things clear.
Now, here's the crucial part, the one that makes it "Dutch." Instead of crossing the Left strand over the Middle, you will cross the Left strand *under* the Middle strand. So, the Left strand moves to the center, but it passes beneath the original Middle strand. Then, you will take the Right strand and cross it *under* the new Middle strand. This is the opposite of the French braid, and it is what creates that beautiful raised effect. You are essentially weaving inward, rather than outward, which is pretty neat.
Just like with the French braid, you will now start adding new hair. Take the strand that is now on the left side. Before you cross it under the current Middle strand, pick up a small, new section of loose hair from the left side of your head. Add this new section to your left strand, making it a bit thicker. Then, cross this combined, thicker Left strand *under* the Middle strand. See how that works? It is the same adding motion, but the weaving direction is different. You are consistently bringing those outer pieces underneath the central one, which is quite important.
You will repeat this on the right side. Take the strand that is now on the right side. Before you cross it under the current Middle strand, pick up a small, new section of loose hair from the right side of your head. Add this new section to your right strand, making it thicker. Then, cross this combined, thicker Right strand *under* the Middle strand. Keep going with this pattern: take an outer strand, add new hair to it, and then cross that combined strand *under* the middle. Try to keep the sections of hair you add consistent in size, and maintain a steady, firm tension. This helps your Dutch braid look really clean and well-defined, which is often the goal.
Continue this process, working your way down your head, until you have incorporated all the loose hair from the sides. Once all the hair is gathered into your three main braiding sections, you can simply continue with a regular three-strand braid, but remember to keep crossing the strands *under* each other, all the way to the ends of your hair. Secure the end with a hair elastic. And there you have it, a striking Dutch braid! It might take a little extra effort to get the hang of the "under" motion, especially if you are used to French braiding, but the result is definitely worth it, as it really stands out.
Tips for Braiding Success
Learning to braid, like any new skill, takes a bit of time and effort. But with some helpful advice, you can really speed up your progress and start creating those lovely styles you have been wanting to try. These little pointers can make a big difference in how your braids turn out and how confident you feel while doing them. So, pay a little attention to these, and you will find your braiding journey to be much smoother, which is pretty great.
Practice Makes Perfect
This really is the most important piece of advice when it comes to braiding, or anything new, honestly. Your first braid might not look exactly like the ones you see in magazines, and that is perfectly okay! The key is to just keep trying. The more you practice, the more your fingers will get used to the movements, and the more intuitive the whole process will become. You could try practicing on a doll's head, if you have one, or even on a friend's hair, if they are willing. Some people even find it helpful to practice on a piece of rope or yarn first, just to get the feel of the weaving motion without the added challenge of hair. Don't get discouraged if it doesn't look perfect right away. Every single person who braids beautifully started right where you are now. So, just keep at it, and you will definitely see improvement over time. It is a bit like learning to ride a bike, you know, you just have to keep pedaling.
Keeping it Neat
A common challenge when braiding is keeping everything looking tidy and smooth. Flyaways and uneven sections can make a braid look a little messy, which is not always the goal. One helpful trick is to use a little bit of product before you start. A light hairspray, a smoothing cream, or even just a tiny bit of water can help tame those stray hairs and make the hair easier to grip. When you are sectioning, try to be as precise as you can. Using a fine-tooth comb to create clean partings can make a huge difference in the overall neatness of your braid. Also, maintaining consistent tension throughout the braiding process is very, very important. If you pull too tight in some spots and too loose in others, your braid will look lumpy. Aim for a firm, even grip from start to finish. And, if you see a few small bumps or flyaways after you are done, a little more hairspray or a dab of smoothing product can help smooth them down. It is all about those little details, you know, that really make a braid shine.
Exploring More Styles
Once you feel confident with the classic, French, and Dutch braids, a whole world of other braiding styles opens up for you. There are so many variations to try, and you can really
Detail Author:
- Name : Gayle McClure
- Username : medhurst.beatrice
- Email : wava08@gmail.com
- Birthdate : 1990-11-23
- Address : 73814 Berge Highway North Angelo, LA 77273
- Phone : 1-484-765-1095
- Company : Anderson, Aufderhar and Luettgen
- Job : HVAC Mechanic
- Bio : Quis qui consequatur dolor odit quasi rerum. Voluptate sint ex quam.
Socials
instagram:
- url : https://instagram.com/o'konk
- username : o'konk
- bio : Non impedit eos corrupti id est voluptatem facere vel. Ut fugiat ullam vel minus.
- followers : 2963
- following : 2670
facebook:
- url : https://facebook.com/kareem_official
- username : kareem_official
- bio : Magnam non excepturi eos velit et.
- followers : 4338
- following : 1211
