
Pipe cleaner flowers are a truly wonderful way to bring a burst of cheer into any spot, and you know, they don't ask for any gardening at all. It's a delightful project, very, very approachable for nearly anyone. These charming little creations give you all the pretty shades and lively feel of real blossoms, but they manage to do so without any of those buzzing visitors, which is quite nice for some people. They really are as straightforward to put together as they are cute to look at, honestly, making them a top pick for a bit of creative fun.
Whether you're looking for something enjoyable to do with young ones, perhaps getting ready to decorate for a special event, or even putting together some thoughtful gifts by hand, pipe cleaner flowers fit the bill perfectly. They bring a touch of whimsy and a splash of lasting color wherever they go. You can pop them into an old, glass soda bottle for a rustic charm, or, you know, add them to a card for a personal touch. They just seem to make everything a little brighter, in a way.
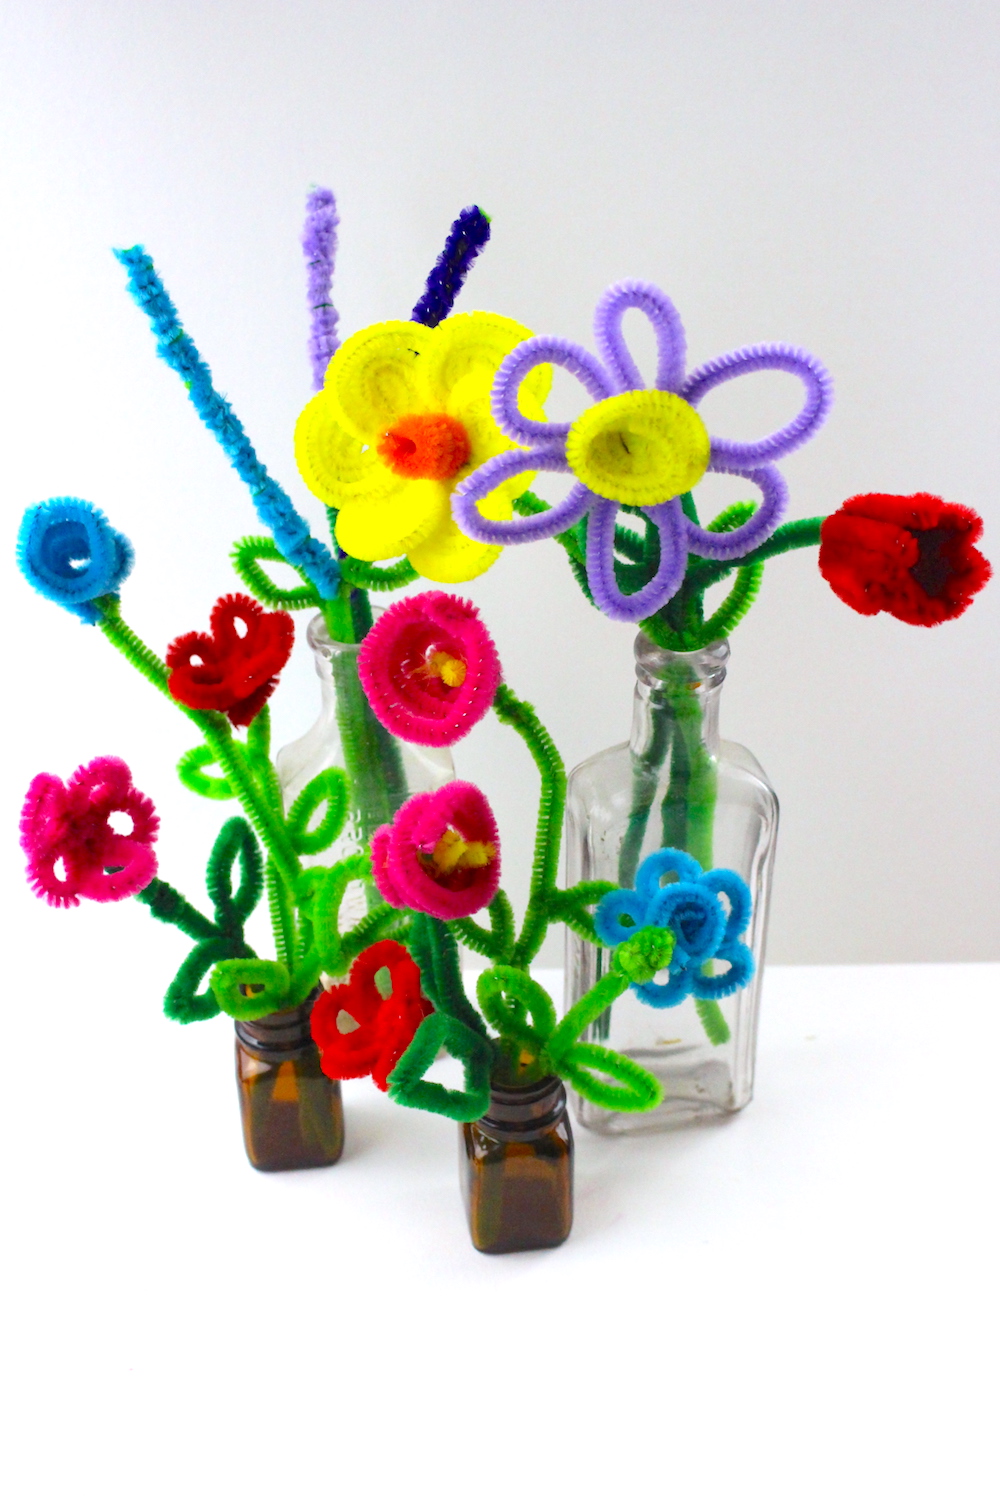
So, we're going to explore how to make these delightful blooms. We'll look at the things you need, some simple methods, and even some clever ideas for making your own special designs. It’s a process that looks far more involved than it actually is, and the results, like those cheerful daffodils, lovely tulips, or elegant hyacinths, would truly make beautiful presents to liven up any home. You can practically make everlasting flowers with just a few twists and turns, which is pretty cool.
Table of Contents
- Why Choose Pipe Cleaner Flowers?
- Gathering Your Materials
- Basic Techniques for Any Flower
- How to Make Pipe Cleaner Daffodils
- Creating Charming Pipe Cleaner Tulips
- Designing Elegant Pipe Cleaner Hyacinths
- Advanced Tips and Custom Designs
- Ideas for Displaying Your Blooms
- Frequently Asked Questions about Pipe Cleaner Flowers
Why Choose Pipe Cleaner Flowers?
Making pipe cleaner flowers is a really fun activity, and it’s pretty straightforward for anyone to pick up. They give you all the lovely looks and bright shades of real flowers, yet they don't attract any of those busy insects, which is a definite plus. You know, they are just as simple to put together as they are charming to behold. They truly look adorable, perhaps in old, glass soda bottles, or maybe even tucked into a small pot. It’s a way to bring lasting color into a room without needing to water anything, basically.
For those who love to craft, or perhaps parents looking for a good project for children, these flowers are a fantastic choice. They are colorful, very easy to construct, and you only need a few basic items to get started. This makes them a perfect activity for a rainy afternoon, or, you know, just whenever you feel like being a little creative. Plus, they last forever, which is a pretty neat trick for a flower.
You can use these handmade blooms for so many things. Stick them onto a greeting card to make it extra special, gather a bunch and put them in a small vase for a pop of color, or give them as sweet, thoughtful gifts. They are a delightful way to add some cheer to any space, and you don't even need to have a green thumb. It's truly a craft that offers a lot of payoff for a little bit of effort, actually.
Gathering Your Materials
To start making your own pipe cleaner flowers, you will find that the list of items you need is quite short and simple. This is part of what makes this craft so appealing, in a way. You will, of course, need a good supply of pipe cleaners. It's usually a good idea to pick a variety of colors, like yellow, orange, and green for daffodils, or maybe red and green if you're thinking about tulips. Having different shades allows for more creative freedom, too it's almost a rainbow at your fingertips.
Beyond the pipe cleaners themselves, you might want to have some scissors on hand. These are handy for trimming down the pipe cleaners if you need shorter pieces, or for shaping certain parts of the flower. A ruler could also be useful if you want to make sure your pieces are a consistent length, though for many designs, just eyeballing it works out fine. That, is that really all you need for the basic projects? Pretty much, yes.
For more involved designs, you could consider adding a little craft glue, perhaps some small beads for flower centers, or even some floral tape to wrap around stems for a more finished look. But for starting out, just the pipe cleaners are enough. It’s a very accessible craft, requiring only a few basic materials, making it easy to jump right in and create something lovely. You know, you probably have most of what you need already, or can get it very easily.
Basic Techniques for Any Flower
Before we get into making specific types of pipe cleaner flowers, it's helpful to know a few basic ways to handle the pipe cleaners themselves. These simple methods will be your building blocks for almost any flower design you want to create. Getting comfortable with twisting, bending, and looping will make the whole process much smoother, you know. It's not complicated at all, just a bit of practice.
Shaping Petals
Creating petals is often the first step for many pipe cleaner flowers. A common way to do this is to take one pipe cleaner and fold it in half, then twist the ends together to form a loop. This loop can then be gently squeezed or shaped into a petal-like form, maybe a bit rounder or a little more pointed, depending on what kind of flower you're trying to make. You can make several of these and then twist them together at their bases to form the main part of your flower. It's a very straightforward approach, really.
Another method involves wrapping a pipe cleaner around your finger or a pencil to create a spiral, then gently pulling it off and shaping it. This can give a different kind of texture or a more open petal look. For smaller petals, you might cut a pipe cleaner into shorter pieces and then bend each piece into a small loop. The key is to experiment a little and see what shapes you can come up with. You'll find it's quite forgiving, actually, so don't worry about getting it perfect on the first try.
Forming Stems and Leaves
Once you have your petals, you'll need a stem to hold them up. This is usually pretty simple. Just take a green pipe cleaner and twist the base of your flower onto one end of it. You want to make sure it's secure so your flower doesn't wobble. You can twist it a few times to give it a good hold. This green pipe cleaner will then serve as the stem, giving your flower some height and structure. It's pretty much like the backbone of your bloom, you know.
For leaves, you can take another green pipe cleaner, or a piece of one, and fold it into a leaf shape. Then, simply twist it around the stem at a point where you think a leaf would naturally grow. You can make them long and slender, or wider and more rounded, depending on the look you're going for. Some flowers, like daffodils, might have longer, more grass-like leaves, while others might have smaller, more distinct ones. It's all about what looks good to you, in some respects.
How to Make Pipe Cleaner Daffodils
Making pipe cleaner daffodils is a truly cheerful project, and they are surprisingly simple to create. To start, you'll want to use yellow and orange pipe cleaners for the flower itself, and green for the stem and leaves. You can pick brighter yellows or softer ones, depending on your preference, as a matter of fact. These flowers are known for their trumpet-like center, which we will replicate using a clever little trick.
Begin your daffodil by laying three yellow pipe cleaners side by side. Twist them together tightly in the middle, creating a sort of star shape with six ends. Now, take two adjacent ends and twist them together to form a loop. Repeat this for the other two pairs of ends, so you end up with three yellow loops, which will be your petals. These should be gently shaped to look like the outer petals of a daffodil, perhaps a little bit flat. You know, it's quite intuitive once you start twisting.
For the trumpet center, take a short piece of orange pipe cleaner, maybe about two or three inches long. Curl this piece around your finger to make a small, tight spiral or a little cup shape. This will be the inner part of your daffodil. Now, thread this orange piece through the center of your yellow petals and twist it securely at the back. Finally, attach a green pipe cleaner to the base for the stem, and add a few long, slender green leaves by twisting them around the stem. You'll have a lovely daffodil in no time, honestly, it's that easy.
Creating Charming Pipe Cleaner Tulips
Crafting beautiful and vibrant flowers doesn't always need a green thumb, and pipe cleaner tulips are a perfect example of this. With just a few simple materials, you can make stunning pipe cleaner tulips that can truly brighten up any room. You can go for classic red, a cheerful pink, or even a deep purple for your petals, and, of course, green for the stem and leaves. They are quite elegant, in a way.
To make a tulip, you'll typically use three or four pipe cleaners for the petals. Take one pipe cleaner and fold it in half, then twist the ends together to form a tear-drop shape. This will be one petal. Make two or three more of these, aiming for a consistent size. Now, gather these petal shapes together at their twisted bases. You want to arrange them so they overlap slightly, forming a cup-like shape, which is characteristic of a tulip. It’s almost like cupping your hand, you know.
Once your petals are arranged, twist their bases together firmly to hold them in place. This forms the head of your tulip. Then, take a green pipe cleaner and twist one end of it securely to the base of your tulip head. This will be the stem. You can add a single, broad leaf by taking another green pipe cleaner, folding it into a leaf shape, and twisting it onto the stem a little way down. These tulips look lovely standing alone or grouped together in a small bunch. They really are quite striking, honestly.
Designing Elegant Pipe Cleaner Hyacinths
Hyacinths, with their dense clusters of tiny flowers, might seem a bit more involved to create with pipe cleaners, but they are surprisingly manageable and yield a very impressive result. These flowers bring a lovely texture and a sense of fullness to any arrangement. You'll want to pick a main color for the flower cluster, like blue, purple, or pink, and then green for the stem. It's a rather unique shape compared to other flowers, so it requires a slightly different approach.
To start your hyacinth, take one pipe cleaner of your chosen flower color. Begin by wrapping one end tightly around your finger or a thin pencil, creating a small, tight coil. Continue coiling the pipe cleaner, pushing the coils close together, until you have a dense, spring-like cylinder. This will be the base of your hyacinth cluster. You can make several of these smaller coils and then connect them, or try to make one longer, more continuous coil. It's a bit like making a spring, you know.
Once you have a good length of coiled pipe cleaner, gently stretch it out just a little bit, so it looks like a textured column. Now, take a green pipe cleaner for the stem. Twist the bottom of your coiled flower piece securely onto the top of the green stem. You might want to use a second green pipe cleaner to wrap around the stem a few times for added stability and a thicker look. Add a few broad, sword-like leaves by twisting green pipe cleaner loops onto the stem near the bottom. These hyacinths have a wonderful, almost sculptural presence, actually.
Advanced Tips and Custom Designs
Once you're comfortable with the basic techniques for pipe cleaner flowers, you can start to experiment and create your own custom designs. The beauty of pipe cleaners is their flexibility; you can bend, twist, and shape them in countless ways. This allows for a lot of personal expression in your crafts. You might try combining different colors within a single petal, or even using multiple shades of the same color for a gradient effect. It's pretty much up to your imagination, you know.
For more intricate details, consider using thinner pipe cleaners or even cutting standard ones lengthwise to get finer strands. This can be great for creating delicate stamens in the center of a flower or for adding very fine veins to leaves. You could also incorporate other small craft supplies, like tiny beads for dew drops, or a little bit of glitter glue for a sparkling effect. These small additions can really make your pipe cleaner flowers stand out, honestly.
Don't be afraid to try making different flower types that aren't listed here. Think about roses, daisies, or even exotic blooms. Break down the flower into its basic shapes: petals, center, stem, leaves. Then, figure out how you can recreate those shapes using pipe cleaners. You might even combine techniques from different flower instructions. The possibilities are nearly endless, so, just have fun with it and see what you can create. Remember, practice often helps you get better at it, too it's almost a given.
Ideas for Displaying Your Blooms
After you've put in the effort to create your lovely pipe cleaner flowers, you'll want to show them off! There are so many charming ways to display these everlasting blooms around your home or to use them as thoughtful gifts. One very simple idea is to gather a small bunch and place them in a tiny vase, perhaps an old, clear glass soda bottle or a cute teacup. This gives a very rustic and homey feel, you know, quite charming.
You can also use your pipe cleaner flowers to decorate other items. Attach them to the front of handmade greeting cards to add a three-dimensional pop of color and a personal touch. They look absolutely delightful when used as embellishments on gift wrapping, making any present feel extra special. For a party, string several together to create a whimsical garland, or use them as unique table decorations. They really do add a cheerful note to any setting, honestly.
Consider making a small "garden" in a pot by sticking your pipe cleaner flowers into a piece of floral foam or even some playdough at the bottom of a decorative planter. This is especially fun for kids to create and display in their rooms. You could also make a colorful bouquet to give to a friend or family member who might need a little brightening up. Since they last forever, these flowers are a constant reminder of your thoughtfulness. Learn more about crafting fun on our site, and perhaps you can even use them to decorate a picture frame. You can find more ideas on this page here.
Frequently Asked Questions about Pipe Cleaner Flowers
Are pipe cleaner flowers hard to make?
Not at all, in fact! Pipe cleaner flowers actually look far more complicated than they truly are. They are as simple to put together as they are cute. With just a few simple steps, anyone can create beautiful blooms that last forever. It's a very approachable craft for people of all skill levels, which is pretty neat.
What can I do with pipe cleaner flowers?
There are so many wonderful things you can do with your finished pipe cleaner flowers! You can add them to a card for a personal touch, throw them in a vase to brighten up a room, or use them as decorations for a party. They also make truly beautiful handmade gifts that can bring a smile to anyone's face. You know, the possibilities are quite broad.
Do I need special tools for pipe cleaner flowers?
No, not really. For most basic pipe cleaner flower designs, you only require a few basic materials, primarily just the pipe cleaners themselves. Sometimes, having a pair of scissors can be helpful for trimming, but it's not strictly necessary for every design. It's a very low-barrier craft, which is great for getting started quickly. You can find general craft supplies at most stores, perhaps even a local craft store.
/PipecleanerFlowers-Header-5ba533f1c9e77c00505d109a.jpg)

Detail Author:
- Name : Miss Sabina Wolf MD
- Username : krystel.ernser
- Email : dayne.sporer@parker.com
- Birthdate : 1987-03-25
- Address : 958 Hermiston Fort East Hellenland, RI 63215-0942
- Phone : +1-820-995-0401
- Company : Toy, Kovacek and Lehner
- Job : Sawing Machine Operator
- Bio : Delectus eaque consequatur nulla rem a dolores occaecati. Eos nihil asperiores nihil.
Socials
facebook:
- url : https://facebook.com/everardo.bartoletti
- username : everardo.bartoletti
- bio : Atque ab magni assumenda fugit dolores.
- followers : 2177
- following : 2259
tiktok:
- url : https://tiktok.com/@everardo2342
- username : everardo2342
- bio : Qui eius ab velit debitis officiis. A sunt accusantium asperiores quia.
- followers : 2208
- following : 2033
