
Drawing hands can feel a bit like trying to catch smoke, can't it? They seem so tricky, always moving, and getting their shape right often feels like a puzzle. Yet, when you want to create art that truly shows life, or perhaps something a little more mysterious, understanding the hand's inner workings is really, really helpful. Learning skeleton hand drawing is, in some respects, the secret key to making all your hand drawings look more real and full of movement.
This guide will show you how to draw skeleton hands that look accurate and believable, using knowledge of basic hand anatomy. We'll break down the bones and shapes, so you can see how everything fits together. It's a rather simple way to get better at drawing one of the most expressive parts of the human body.
You'll learn not only how to capture the basic shapes and proportions of a skeleton hand, but also how to add details and shading to bring your drawing to life. We have the perfect tutorial for you today, where you can learn how to draw a skeleton hand with easy drawing instructions and a video tutorial. A pro artist shares a video & images so you can follow along, too. By following the simple steps, you too can easily draw a perfect skeleton hand.
Table of Contents
- Why Learn Skeleton Hand Drawing?
- Getting Started: The Hand's Basic Structure
- Your Step-by-Step Guide to a Perfect Skeleton Hand
- Common Questions About Drawing Skeleton Hands
- Start Your Skeleton Hand Drawing Today!
Why Learn Skeleton Hand Drawing?
Skeleton hand drawings are a valuable tool for understanding how mobile the hand’s structure is, you know? When you can see the bones, it's easier to grasp how the hand twists, bends, and grasps things. This knowledge makes your living hand drawings look so much more believable, actually.
It helps you put hands in different positions without them looking stiff or unnatural. Knowing the bone structure underneath gives you a solid base for adding muscle and skin later. So, it's really about building a strong foundation for all your hand art.
This kind of drawing also helps you appreciate the intricate design of the human body. Each bone plays a part in the hand's amazing range of motion. It's a bit like learning the alphabet before you write a story; you need to know the parts before you can make the whole thing work, you see.
Getting Started: The Hand's Basic Structure
Before we start putting pencil to paper, it's good to get a feel for the hand's main parts. We’ll examine the many bones that make up the hand in detail in this skeleton hand drawing lesson. This helps you figure out where everything should go, which is quite important for a drawing that looks right.
Think of the hand as having three main sections: the wrist area, the palm area, and the fingers. Each section has its own set of bones, and understanding how they connect is truly the first step. This basic layout helps you proportion out the proportions of each part of the skeleton hand, too.
In this lesson, we will begin with a new piece of paper and discover how to draw a skeleton hand in 6 instructive steps. We'll start with the big shapes, then move to the smaller bits. It’s best if we proportion out the proportions of each part of the skeleton hand early on, you know, to get the general size right.
Bones You'll Want to Know
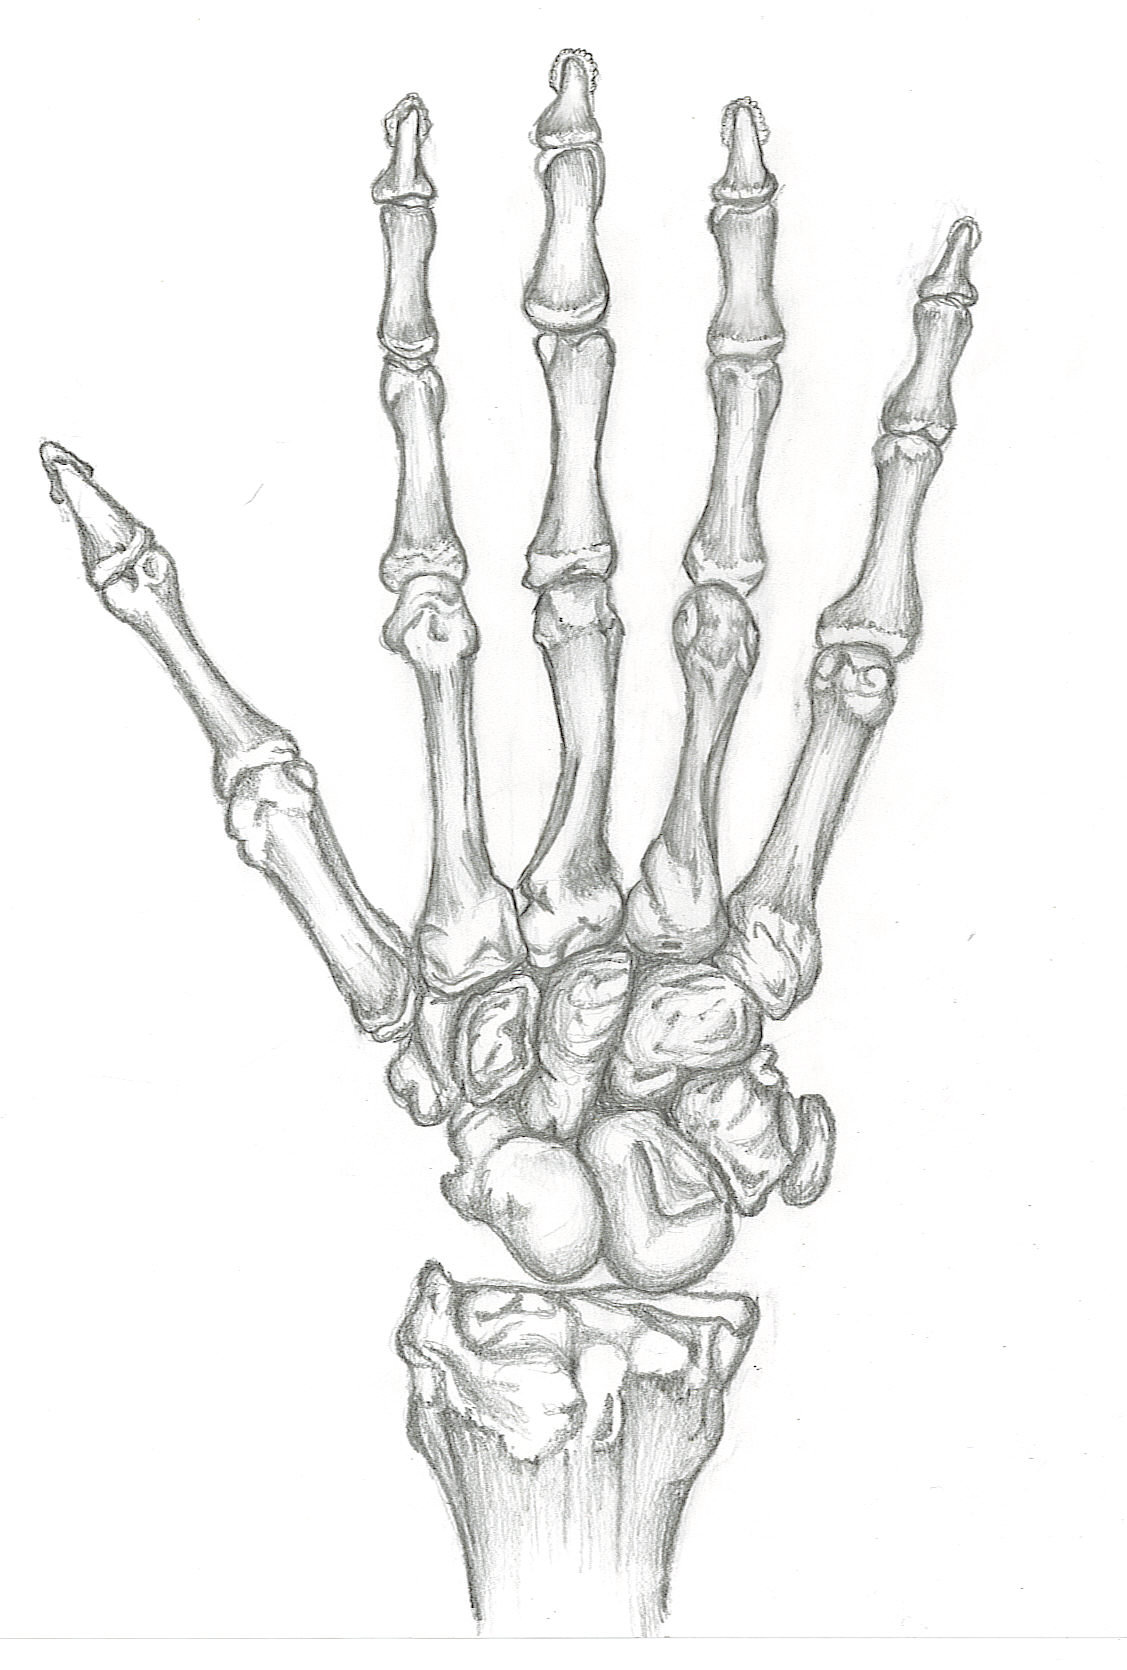
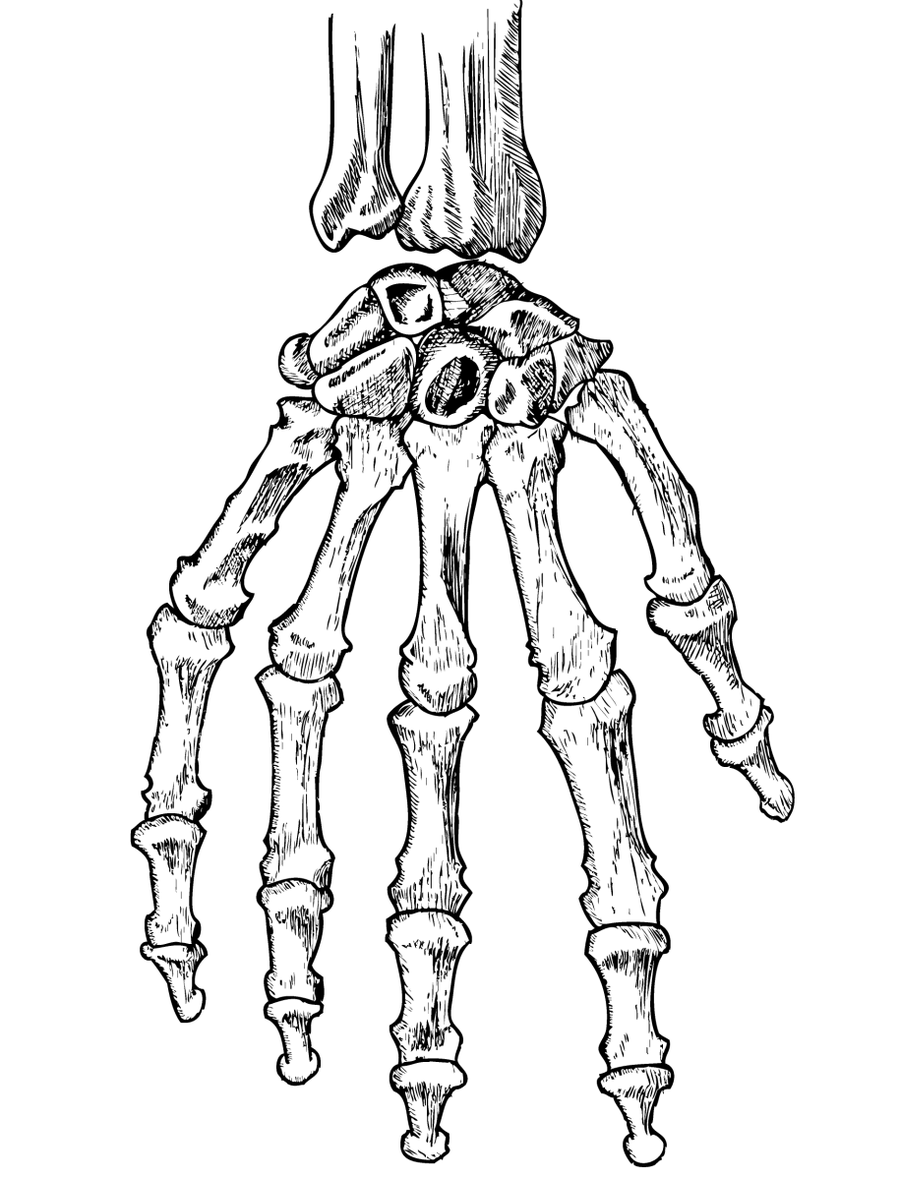
The hand has a lot of bones, but for drawing, we can group them. First, there are the carpals, which are the small, pebble-like bones in the wrist. They form a sort of flexible base for the hand. There are eight of them, and they allow for a lot of movement at the wrist, which is pretty cool.
Next, we have the metacarpals. These are the five long bones that make up the palm of your hand. They connect the carpals to your fingers. Each finger has its own metacarpal, and they spread out a bit, like spokes on a wheel, which is something to keep in mind when drawing.
Finally, there are the phalanges, which are the bones in your fingers and thumb. Your thumb has two, and each of your other fingers has three. These are the bones that allow your fingers to bend and curl. Knowing these three main types of bones is, actually, a huge help for any skeleton hand drawing.
Proportions Are Key, Too
Getting the right size relationships between the different parts of the hand is really important for a believable drawing. For example, the length of the palm often relates to the length of the middle finger. It's not always exact, but it gives you a good starting point.
When you begin your skeleton hand drawing, try to sketch out the overall shape of the hand first, almost like a paddle or a mitten. Then, you can start dividing that shape into the wrist, palm, and finger sections. This helps you get the general size and placement correct before adding any bone details.
It’s best if we proportion out the proportions of each part of the skeleton hand early on. This means thinking about how long the fingers are compared to the palm, or how wide the hand is at the knuckles compared to the wrist. Getting these big relationships right makes a huge difference, truly.
Your Step-by-Step Guide to a Perfect Skeleton Hand
In this tutorial, we’ll cover the basic anatomy of the hand and how to use that knowledge to draw skeleton hands that look accurate and believable. Then we’ll guide you through the steps for a beginners’ guide to skeleton hand drawing in just 5 easy steps. Or, in this lesson, we will begin with a new piece of paper and discover how to draw a skeleton hand in 6 instructive steps, depending on how you break it down.
Throughout this guide, you’ll learn not only how to capture the basic shapes and proportions of a skeleton hand, but also how to add details and shading to bring your drawing to life. By following the simple steps, you too can easily draw a perfect skeleton hand. So, let's get started, shall we?
Step 1: Laying the Foundation
Start by lightly sketching the overall shape of the hand, almost like a simple block or a paddle. This initial shape helps you place the hand on your paper and get its general size right. Think of it as mapping out where the wrist, palm, and fingers will roughly go.
You can use simple geometric shapes, like a rectangle for the palm and lines for the fingers, to begin. This step isn't about detail yet; it's about getting the large proportions down. This is, actually, a very important part of the process, as it sets the stage for everything else.
Remember to consider the angle of the hand, too. Is it open, closed, pointing? A simple line or shape can represent the angle you want. This initial sketch should be very light, so you can easily erase and adjust it as you go.
Step 2: Defining the Major Bones
Now, inside that basic shape, start to sketch the main bones. Begin with the carpals in the wrist area, perhaps as a small cluster of circles or ovals. Then, draw the five metacarpals, extending from the carpals into the palm area.
These metacarpals should be drawn as long, thin shapes, like little sticks. Remember that they fan out slightly. This step helps you place the core structure of the hand before you get to the individual fingers. It's like building the frame of a house before adding the walls, you know.
Try to get the length of these bones right in relation to each other. The metacarpal for the thumb is usually a bit shorter and thicker, and it sits at a different angle than the others. This is a rather crucial detail for accuracy.
Step 3: Adding Finger Details
Once the metacarpals are in place, you can add the phalanges, the finger bones. Each finger has three segments, except for the thumb, which has two. Draw these as smaller, elongated shapes, connecting them to the end of the metacarpals.
Pay attention to the joints, which are where the bones meet. These are the points where the fingers bend. You can represent these joints with small circles or slightly wider areas on your bone shapes. The way the fingers curve and taper is also something to watch for, you see.
Make sure the finger bones get progressively smaller as they go towards the fingertips. The last segment, the distal phalanx, is the smallest. This step is where your skeleton hand drawing really starts to take shape and look like a hand.
Step 4: Bringing it to Life with Shading
With the basic bone structure drawn, you can start adding depth with shading. Think about where light would hit the bones and where shadows would fall. Bones are not flat; they have curves and bumps, and shading helps show this.
Use lighter pressure for areas facing the light and darker pressure for areas in shadow or crevices. This creates a sense of three dimensions, making your skeleton hand drawing look less like a flat outline and more like a solid object. This is, honestly, where the magic happens.
You can also use cross-hatching or stippling for different textures, if you like. The goal is to make the bones appear rounded and real. A little bit of shading can go a very long way in making your drawing pop off the page.
Step 5: Adding Thematic Touches
If you want to give your skeleton hand drawing a bit more character or a specific mood, you can add thematic elements. In this lesson, we’re gonna break down how you can create a detailed skeleton hand, complete with some cool thematic elements like fallen leaves and a tombstone, for example.
These extra details can tell a story or set a scene around your drawing. Maybe a few cracks in the bones, or some dust gathered in the joints. These small additions can make your drawing feel more complete and unique, you know.
This step is optional, of course, but it allows for a lot of creative expression. It's a way to personalize your art and make it truly your own. So, feel free to experiment with different elements that fit the mood you're going for.
Pro Tips from an Artist
A pro artist shares a video & images so you can follow along! Watching someone else draw, especially an experienced artist, can teach you so much. Look for tutorials that show the process step-by-step, explaining their choices as they go.
Practice is truly the biggest teacher. The more you draw skeleton hands, the better you'll get at it. Don't be afraid to make mistakes; they're part of the learning process. Just keep sketching and trying new things, that's what matters.
Also, study real hand anatomy if you can. Look at your own hand, feel the bones, and try to understand how they move. This direct observation is incredibly helpful for making your drawings look accurate and believable, too. Learn more about drawing anatomy on our site.
Common Questions About Drawing Skeleton Hands
How do you draw a skeleton hand step by step?
Drawing a skeleton hand step by step begins with a light sketch of the hand's overall shape and position. Then, you lay out the main bone groups: the carpals in the wrist, the metacarpals for the palm, and the phalanges for the fingers. You connect these with simple shapes, gradually adding more detail to each bone, making sure the joints are clear.
After outlining the basic bone structure, you refine the shapes to make them look more like actual bones, adding curves and bumps. The final steps involve adding shading to give the drawing depth and dimension, making it appear three-dimensional. You can also include thematic elements like cracks or surrounding objects to enhance the scene, if you like.
This process breaks down a complex subject into manageable parts, making it easier for anyone to follow along. It's about building your drawing piece by piece, rather than trying to get everything perfect all at once. By following the simple steps, you too can easily draw a perfect skeleton, actually.
What are the basic bones of a hand for drawing?
For drawing purposes, the hand's basic bones are grouped into three main categories. First, there are the carpals, which are the small, irregular bones forming the wrist. These eight bones provide the flexibility at the base of the hand and connect to the forearm bones.
Next, you have the metacarpals, which are the five long bones that make up the palm of the hand. Each finger, including the thumb, has one metacarpal. These bones spread out from the wrist, forming the main structure of the hand's body, you know.
Lastly, there are the phalanges, which are the bones of the fingers and thumb. Each finger has three phalanges (proximal, middle, and distal), while the thumb has two. These bones articulate at the joints, allowing the fingers to bend and curl. Knowing these three types is pretty much all you need to start your skeleton hand drawing.
Why are hands so tricky to draw?
Hands can be tricky to draw for a few reasons, honestly. They have a very complex structure with many small bones, muscles, and tendons, all working together. This means there are a lot of moving parts to keep track of, which can be a bit overwhelming at first.
Also, hands are incredibly expressive and mobile. They can take on countless poses, from a gentle clasp to a clenched fist, and each pose changes the appearance of the hand quite a bit. Capturing these subtle shifts in shape and proportion is a challenge for many artists.
Another reason is that we see hands every day, so we have a very strong sense of what looks "right" or "wrong." Even a small mistake in proportion or angle can make a drawn hand look unnatural. This is why skeleton hand drawings are a valuable tool for understanding how mobile the hand’s structure is, helping artists get past these difficulties. You can learn how to draw a great looking skeleton hand with easy drawing instructions and video tutorial, too. For more drawing tips, check out our drawing tips page.
Start Your Skeleton Hand Drawing Today!
By now, you have a good grasp of the basics of skeleton hand drawing. It's a skill that takes practice, but the rewards are truly worth it. Understanding the bones beneath the surface will make all your hand drawings, whether skeletal or fleshy, much more believable and dynamic.
So, grab your pencil and paper, and give it a try. Remember, every great artist started somewhere, and each line you draw brings you closer to mastering this fantastic subject. You'll be amazed at what you can create with a little patience and the right guidance.
![Easy Skeleton Hand Drawing In 5 Steps [Video + Illustrations]](https://www.biowars.com/wp-content/uploads/2023/03/skeleton-hand-drawing-details.jpg)
Detail Author:
- Name : Ms. Lynn Dooley II
- Username : kshlerin.idella
- Email : bosco.renee@stanton.com
- Birthdate : 1975-09-13
- Address : 29508 Jerrell Hollow East Kory, SD 69009-3461
- Phone : 272-324-6378
- Company : Prosacco-Strosin
- Job : Product Management Leader
- Bio : Natus et qui et omnis nulla. Eius quas iure molestiae velit fuga. Quis omnis ex nisi fugiat occaecati eum. Quia sequi et voluptate sint voluptates accusantium.
Socials
linkedin:
- url : https://linkedin.com/in/stamm2017
- username : stamm2017
- bio : Dolorum impedit qui architecto.
- followers : 6175
- following : 1607
facebook:
- url : https://facebook.com/annetta4126
- username : annetta4126
- bio : Aut aperiam eius voluptatibus quia aut. Qui velit provident et voluptates.
- followers : 140
- following : 2343
tiktok:
- url : https://tiktok.com/@stamm2016
- username : stamm2016
- bio : Minus non soluta natus dignissimos officia.
- followers : 3365
- following : 2077
