
Do you find yourself wanting to put pencil to paper, yet a bit unsure where to begin with drawing faces? It's a common feeling, you know. Many folks, when they first start sketching people, often feel a little stuck when it comes to the eyes. After all, eyes are pretty expressive, and getting them just right can make a huge difference in how your drawing looks and feels.
Getting a human eye to look real, or at least believable, might seem like a rather big task at first glance. But honestly, it's not as hard as you might think. With some simple guidance and a little practice, you can definitely learn to sketch eyes that have life and feeling. This guide is here to help you do just that, offering a clear path for anyone just starting out.
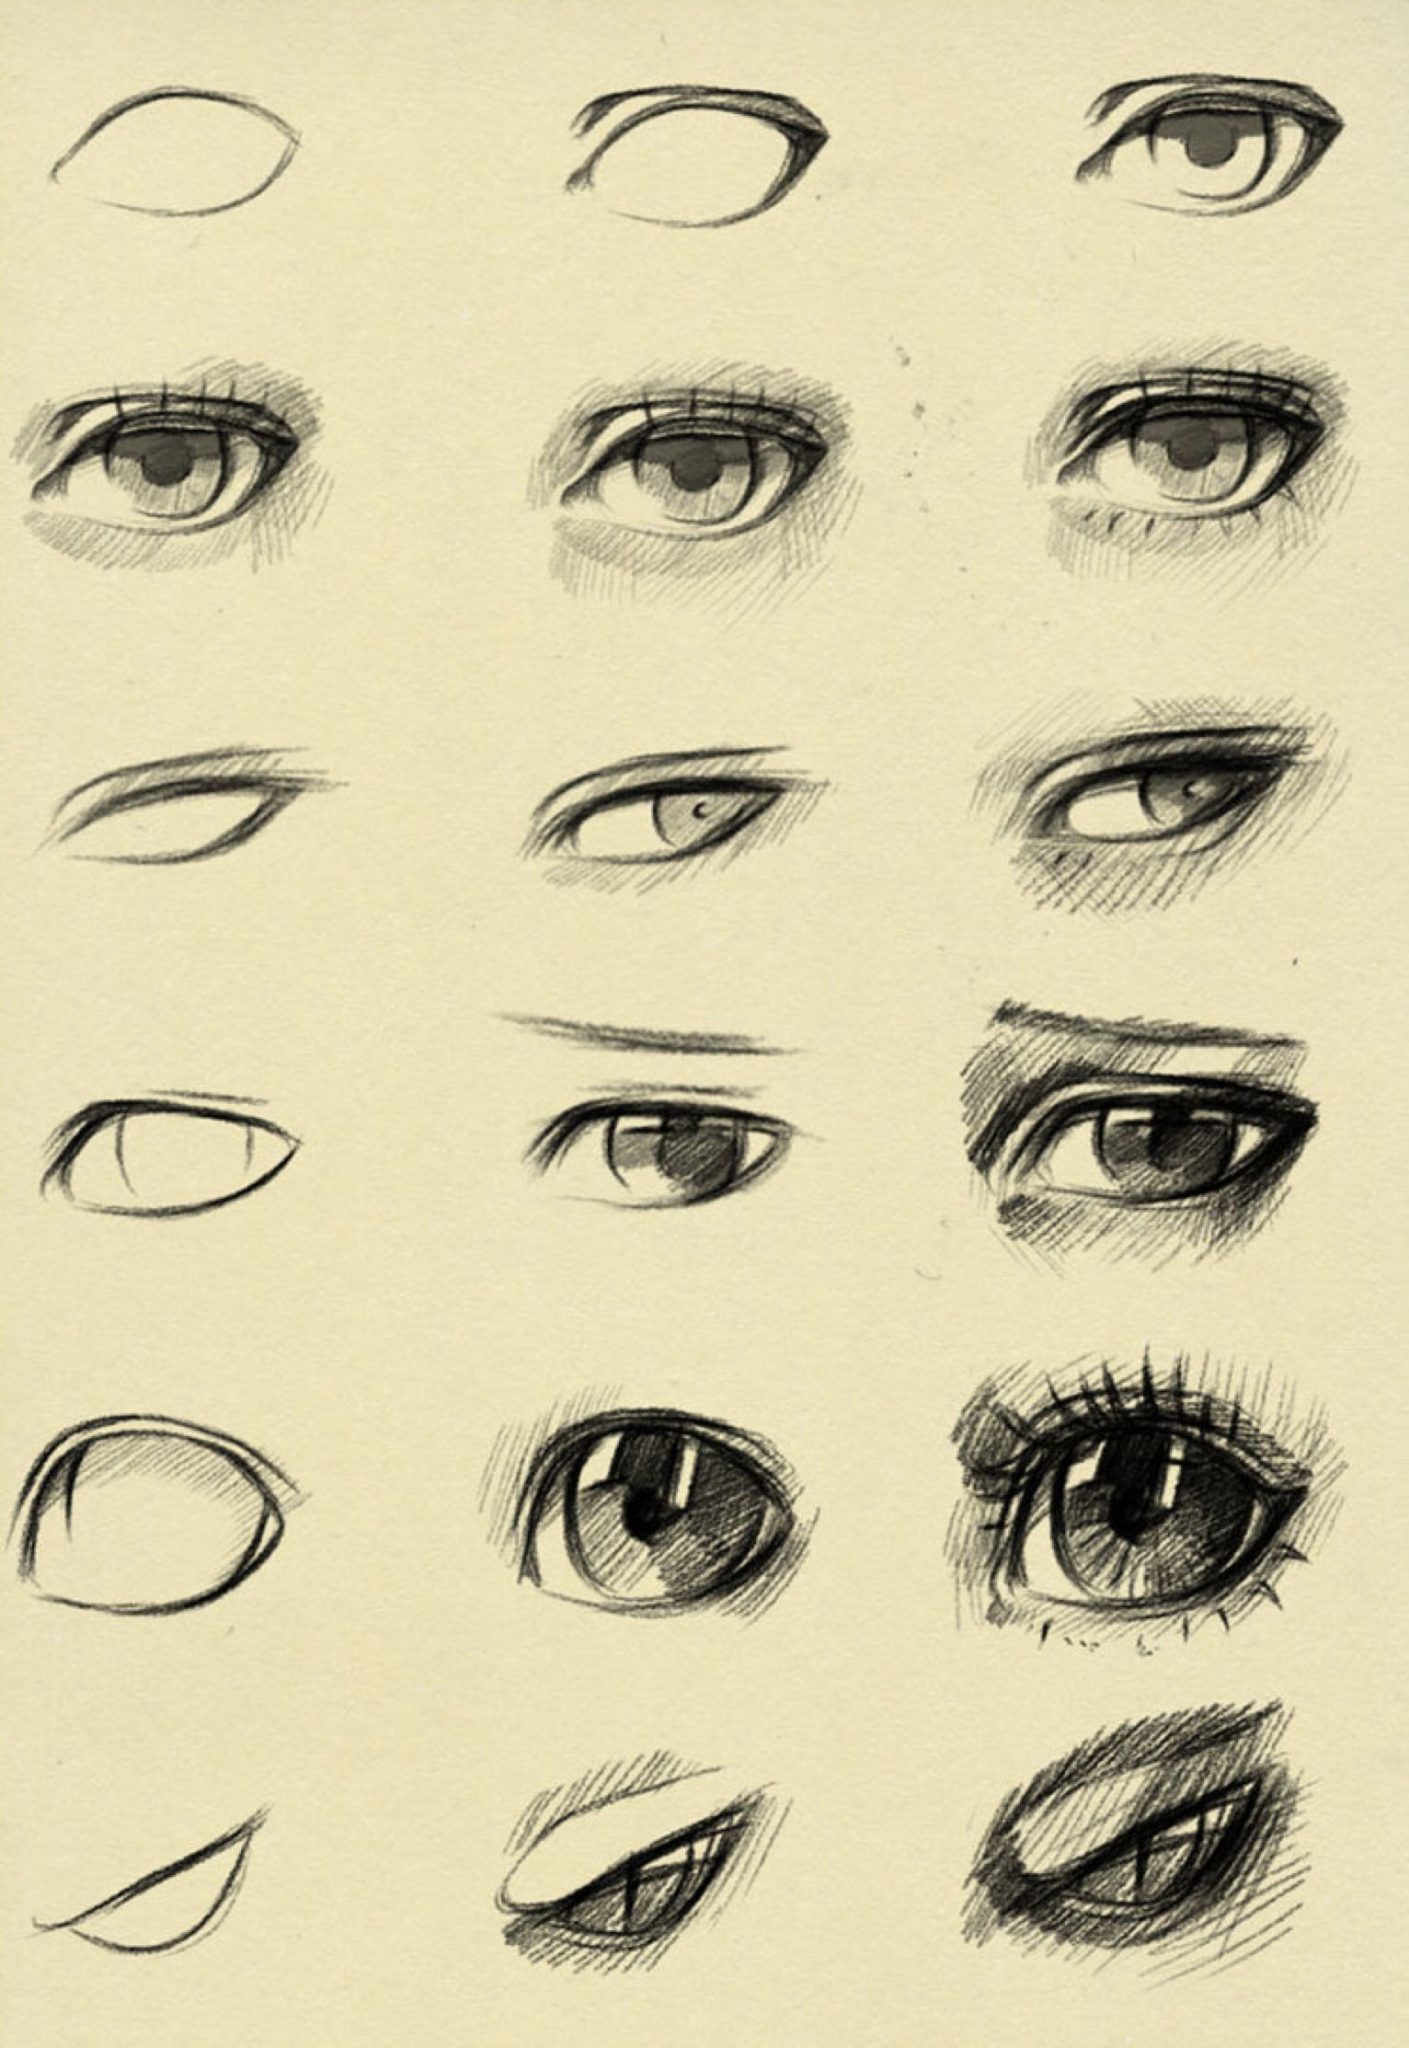
We'll break down the process into small, manageable steps, so you can build your skills piece by piece. You'll see that, with each line you draw, the eye begins to take shape, and you'll get a real sense of accomplishment. It's truly amazing how much detail and emotion can be conveyed with just a few well-placed marks, and we'll show you how to get there, more or less, without any fuss.
Table of Contents
- Getting Started: What You'll Need
- The Basic Shape of the Eye
- Adding the Iris and Pupil
- Creating Depth and Form
- Eyelashes and Eyebrows
- Tips for Making Your Eyes Look Alive
- Common Questions About Drawing Eyes
- Bringing It All Together
Getting Started: What You'll Need
Before we even pick up a pencil, it's good to gather a few simple things. You don't need anything fancy, just some basic art supplies that you probably have lying around. So, really, this part is pretty straightforward.
You'll want a few pencils with different lead hardness. A good starting point is an HB pencil for general sketching, a 2B or 4B for darker areas and shadows, and maybe a 2H for very light guide lines. You know, just to get those faint marks down.
Then, grab an eraser. A kneaded eraser is actually very helpful because it can lift graphite without smudging too much, and you can shape it into a point for small corrections. A regular plastic eraser works fine too, of course. You'll also need some drawing paper, any kind will do for practice, as a matter of fact.
Finally, a blending stump or even a cotton swab can be useful for smoothing out shading. You could also just use your finger, but sometimes that spreads natural oils from your skin onto the paper, which can make things a little messy, you know? Just a few simple tools will set you up for success here.
The Basic Shape of the Eye
The first step in drawing an eye that looks right is to understand its basic structure. It's not just a flat shape on the face; it has a certain form to it. This really helps, you see, when you're trying to get that sense of depth.
The Eyeball as a Sphere
Think of the actual eyeball as a sphere, like a small ball, tucked into the skull. The eyelids then drape over this ball. When you draw, it helps to first lightly sketch a circle for where the eyeball sits. This circle won't be fully seen, as the eyelids cover much of it, but it gives you a guide for how the lids will curve around it. This is, you know, a pretty important starting point.
This initial circle helps you understand how the eye will sit in its socket. It provides a kind of anchor for all the other parts you'll add. Without this underlying shape, your eye might look flat, or perhaps a bit unnatural. So, basically, start with a light circle, just a guide, for the sphere of the eye.
The Outer Lids and Their Curve
Once you have your light circle, you can begin to draw the outer shape of the eyelids. Remember, the upper lid usually covers a bit more of the iris than the lower lid. The upper lid also tends to have a more pronounced curve, arching over the eye. The lower lid is typically flatter, or it has a much gentler curve, you know?
Sketch these lines lightly at first. You want to get the overall almond-like shape. The inner corner of the eye, near the nose, is usually a bit lower than the outer corner, or it can be roughly on the same level. This slight tilt can add character, you see. Just make sure your lines are loose and easy to adjust right now.
Pay attention to the thickness of the eyelids too. They aren't just thin lines; they have a bit of depth to them. This is especially true for the upper lid, which casts a slight shadow. So, in some respects, adding this small detail can really make a difference to how real it looks.
Adding the Iris and Pupil
Now that you have the general shape of the eye, it's time to put in the parts that give it its color and focus. This is where the eye really starts to come alive, you know?
Placing the Iris
The iris is the colored part of the eye. It's a circle, but remember, the eyelids usually cover a bit of it at the top and sometimes at the bottom. So, when you draw it, it will look like a partial circle, a bit like a rainbow peeking out. Try to make sure it's centered within the eyelids, or at least where the person is looking, naturally.
Lightly sketch the circle of the iris. Don't press too hard, because you might need to adjust its position slightly. The size of the iris can vary a little from person to person, but it usually takes up a good portion of the visible eye area. You know, it's pretty noticeable.
When you're happy with its placement, you can start to add some subtle lines within the iris. These lines radiate out from the center, like spokes on a wheel, and they give the iris its texture. This actually helps a lot with making it look real, to be honest.
The Pupil: The Dark Center
Right in the middle of the iris is the pupil, which is the black circle that lets light into the eye. This part is always very dark, almost completely black, and it's perfectly round. Make sure to draw it as a clear, dark circle right in the center of your iris. This is, like, super important for the eye's focus.
The pupil doesn't change shape unless it's reacting to light, which we usually don't show in a basic drawing. So, just draw it as a solid black circle. The contrast between the dark pupil and the lighter iris really helps define the eye. It's, you know, a pretty key element.
Sometimes, people forget to make the pupil dark enough. But making it truly black will give your eye drawing a lot more impact and a sense of depth. It's a small detail, but it really makes a difference, you know?
Creating Depth and Form
An eye isn't flat, and your drawing shouldn't be either. Adding shadows and highlights is how you give your eye drawing that three-dimensional look, which is, honestly, what makes it seem alive.
Light and Shadow: Making It Pop
Think about where the light source is coming from. Usually, there's a bright spot, a highlight, on the iris and pupil. This is a tiny, often irregular shape of light reflecting off the wet surface of the eye. This little spot of light is incredibly important for making the eye look shiny and alive. It's, you know, a very small but powerful detail.
The upper eyelid typically casts a shadow over the top part of the eyeball and iris. This makes the top of the iris appear darker than the bottom. Also, the white part of the eye, called the sclera, isn't pure white. It has subtle shadows, especially near the corners and where the eyelids meet it. Use a very light gray for these areas, not pure white. This helps it look more like a sphere, you see.
You can use your softer pencils (like 2B or 4B) for the darker shadows and your blending stump to smooth out the transitions. Don't be afraid to make some areas quite dark, especially the pupil and the shadow under the upper lid. This contrast is, like, totally what makes it look real.
The Tear Duct and Inner Corner
The tear duct is that small, pinkish bump in the inner corner of the eye, closest to the nose. It's a small detail, but including it makes the eye look much more realistic. It usually has a soft, slightly rounded shape. You know, it's pretty subtle.
Around this area, and in the outer corner, the skin often forms slight folds or creases. These are very soft lines that show the natural movement and structure of the skin around the eye. Don't draw them too sharply; they should be just faint suggestions. This really helps with the overall appearance, you see.
The skin around the eye is also very thin, and it can show subtle variations in tone. Paying attention to these small forms and slight changes in shade will add a lot of depth to your drawing. It's, like, a bit more advanced, but still pretty easy to try.
Eyelashes and Eyebrows
Eyelashes and eyebrows frame the eye and add a lot to its character. They can make an eye look soft, intense, or even a little tired. So, they're pretty important, you know?
Drawing Eyelashes
When drawing eyelashes, don't draw them as straight lines or as a solid fringe. Eyelashes grow in curves, usually pointing upwards from the upper lid and downwards from the lower lid. They also tend to clump together a bit, so draw them in small groups rather than as individual, perfectly spaced hairs. This is, honestly, a common mistake people make.
The lashes on the upper lid are typically longer and thicker than those on the lower lid. They also tend to be darker. Start drawing them from the base of the eyelid, sweeping outwards in a curved motion. Make some shorter, some longer, to give them a more natural look. You know, a bit varied.
Remember that eyelashes have volume. They aren't flat. They stick out from the eyelid. This means you might see their thickness at the base. This little detail can really make them pop, actually.
A Word on Eyebrows
Eyebrows are like the frame for the whole eye area. They follow the curve of the brow bone and consist of many individual hairs that grow in different directions. Don't draw them as a solid block; instead, use short, feathery strokes to suggest individual hairs. This is, like, a really good way to make them look real.
The density and shape of eyebrows vary greatly from person to person, so pay attention to your reference if you're drawing a specific person. Some eyebrows are thick and bushy, while others are thin and sparse. The hairs usually grow outwards from the center of the face, then curve down towards the temples. So, in a way, they follow a natural flow.
The eyebrow also casts a subtle shadow over the eye socket, adding more depth to the overall face. This shadow helps to define the eye's placement within the skull. It's a pretty subtle effect, but it really adds to the realism, you know?
Tips for Making Your Eyes Look Alive
Beyond the basic shapes, there are a few extra touches that can truly bring your eye drawing to life. These little things make a big difference, honestly.
One key thing is to add reflections. We talked about the highlight on the iris, but sometimes you might see other subtle reflections, like a window or a light source, in the eye. These are often small and abstract, but they add a sense of wetness and shine. You know, it's pretty cool how light works on the eye.
Another tip is to vary your line weight. Don't draw everything with the same pressure. Use darker, firmer lines for areas that are closer or cast a strong shadow, like the top edge of the upper eyelid. Use lighter, softer lines for subtle creases or lighter areas. This variation creates visual interest and depth, more or less automatically.
Practice drawing eyes from different angles. An eye looking straight ahead is one thing, but an eye looking to the side, or up, or down, will have different visible parts and different curves. This helps you understand the eye as a three-dimensional object in space. It's, like, a bit of a challenge, but very rewarding.
Remember that the human eye is a truly remarkable thing, a complex marvel that allows us to experience the world with such clarity. From the precise work of professionals like those at Buffalo Eye Center, who help people preserve their eye health and improve their eyesight, to the simple act of drawing, we can appreciate the incredible structure and function of this organ. Thinking about how it works can even, you know, inspire your drawing.
Common Questions About Drawing Eyes
How do I make the eye look more expressive?
To make an eye look more expressive, pay close attention to the eyelids and eyebrows. A slight raise of an eyebrow, or a subtle narrowing of the eyelids, can change the whole mood. The highlight in the eye also plays a big part; its shape and placement can suggest emotion. For example, a very bright, sharp highlight can make an eye look more alert, or even surprised, you know?
What's the best way to practice drawing eyes?
The best way to practice is simply to draw lots of eyes. Draw them from photos, from life (if you have a willing subject!), and even from memory. Try drawing different types of eyes – wide, narrow, old, young. Focus on one element at a time, like just the eyelashes, or just the shading of the iris. This helps build your skills bit by bit. You know, it's pretty effective.
How do I avoid making the eye look flat?
To keep your eye from looking flat, remember the sphere underneath the eyelids. Use shading to show the curve of the eyeball and the eyelids. The upper eyelid casting a shadow is really important for this. Also, the white of the eye isn't pure white; it has subtle shadows that follow the curve of the sphere. Adding these shadows makes it look round, you see.
Bringing It All Together
Learning to draw an eye, especially making it look easy and natural, really comes down to breaking it into smaller parts. You start with simple shapes, then gradually add more detail, layer by layer. It's a bit like building something, piece by piece, you know?
Remember, practice is your best friend here. The more you draw, the more comfortable you'll become with the shapes, the shading, and those little touches that bring an eye to life. Don't worry if your first few attempts aren't perfect; every artist starts somewhere. Just keep sketching, and you'll definitely see progress.
So, why not grab your pencils right now and give it a try? You might be surprised at what you can create with these simple steps. You can also learn more about art techniques on our site, and check out some amazing drawing inspirations for your next project. Keep drawing, and have fun with it!
For more insights into the intricate structure of the human eye, which can inspire your artistic endeavors, consider exploring resources from medical professionals. For example, you can learn more about the eye's structure and how it works by visiting a trusted source like the National Eye Institute.


Detail Author:
- Name : Margaret Murazik
- Username : maverick79
- Email : brennan48@feeney.com
- Birthdate : 1991-12-24
- Address : 850 Goyette Ville Erdmanberg, GA 13648
- Phone : +1-425-844-5202
- Company : Murphy, Prohaska and Stoltenberg
- Job : Carpenter
- Bio : Placeat dolores numquam amet corporis. Laboriosam vero excepturi reiciendis minus ab ab. Et minima dolores necessitatibus sapiente reprehenderit cupiditate.
Socials
tiktok:
- url : https://tiktok.com/@sbeatty
- username : sbeatty
- bio : Sit aperiam vitae quibusdam necessitatibus sunt.
- followers : 2332
- following : 988
twitter:
- url : https://twitter.com/beattys
- username : beattys
- bio : Enim nam assumenda itaque ut. Eos dicta voluptatem eum doloremque. Velit doloremque voluptatem nesciunt et quaerat natus qui rerum.
- followers : 3257
- following : 1244
instagram:
- url : https://instagram.com/beattys
- username : beattys
- bio : Aut iure harum dolores quo dolor. Optio dolore consequatur ipsum maiores eligendi.
- followers : 6213
- following : 1041
facebook:
- url : https://facebook.com/stellabeatty
- username : stellabeatty
- bio : Accusantium pariatur tempora quisquam.
- followers : 1758
- following : 2223
