
The french braid, you know, is a really beautiful and classic hairstyle, a favorite for so many people. It’s got that elegant look that just works for nearly any occasion, whether you're heading out for something casual or perhaps a bit more dressed up. Many folks, too, think its woven pattern looks pretty complicated, almost like a puzzle, but honestly, making your own french braid is quite doable.
You might be wondering, can I really learn how to french braid if I've never done it before? The answer is a clear yes! We're going to walk through everything together, showing you how to separate your hair, how to bring in new pieces as you go along, and how to keep everything looking neat and tidy. It’s a process that, you know, just takes a little practice.
This article offers a straightforward guide to a basic, classic french braid. If you can get this style down, it’s like unlocking a secret level for all sorts of other, more detailed hairstyles. Many of those fancy looks, you see, actually use a french braid as their starting point. So, mastering this one style can really open up a lot of possibilities for your hair, which is pretty cool.
Table of Contents
- Getting Ready for Your Braid
- The Six Simple Steps to a Classic French Braid
- Tips for a Perfect French Braid
- Going Beyond the Basic Braid
- Frequently Asked Questions About French Braids
- Your Braiding Journey Starts Now!
Getting Ready for Your Braid
Before you even pick up a strand of hair, a little preparation can make a big difference, you know? Start with hair that's clean and brushed through. Any knots or tangles will just make the process harder, and that's something we want to avoid. Some folks find that hair that's a day or two old, rather than freshly washed, can be a little easier to work with, as it has more grip. You might also want to have a comb with a fine-tooth end ready, along with some hair ties or elastics to finish things off.
Having a good mirror, or even two mirrors so you can see the back of your head, can be super helpful, too. This way, you can really see what you’re doing as you go. Remember, this is about learning, so don't feel bad if it doesn't look perfect the very first time. It's a skill that builds up over time, actually, just like anything new you try.
The Six Simple Steps to a Classic French Braid
Learning how to french braid your hair in just a few easy steps is totally possible, with some advice from people who know a lot about hair. This guide, you see, breaks down each part with clear instructions. We’re going to make sure you have all the information you need to get started right now. So, let’s get into the how-to!
Step 1: The Starting Section
To begin, you'll want to pick up a section of hair right at the top of your head, near your forehead. This section should be, say, about three inches wide, more or less, and it's important that it's somewhat even. You want to make sure it's smooth and free of any bumps. This initial piece, you know, is the foundation for your whole braid, so taking a moment to get it right here really helps later on.
Once you have that top section, divide it into three equal smaller strands. Think of them as your left, middle, and right pieces. Keeping these three sections separate and distinct from the start is, honestly, a key part of making the braid look good. This is where your fingers really start to do their work, so try to hold them firmly but gently.
You might find it helpful to use a comb to get a really clean part for this first section. Sometimes, just using your fingers can leave little flyaways, and we want this to be as neat as possible, you know? This initial division is, basically, just like setting up the pieces on a board before you start a game. It's all about preparation for the next moves.
Step 2: Your First Three-Strand Weave
Now that you have your three strands, you're going to start with a very basic, traditional three-strand braid. Take the right strand and cross it over the middle strand. The right strand is now in the middle position, and the original middle strand is now on the right. Then, take the left strand and cross it over the new middle strand. This is, you know, the very first weave of your french braid.
This first pass is super important because it sets the pattern for the rest of the braid. Make sure your tension is even here. You don't want it too tight, but not too loose either. It's a bit like finding a good rhythm, you know? This initial weaving, basically, just gets the hair flowing in the right direction.
Practice this simple over-and-over motion a few times if you need to, just on that top section. It's really the core movement you'll be repeating. You'll find that once you get comfortable with this basic cross, the rest of the braid starts to feel more natural, which is pretty neat. It's, like, the building block for everything else you're going to do.
Step 3: Adding Hair from the Sides
This is where the "french" part of the french braid really comes in. After you've completed that first basic weave, you're going to start picking up hair from the outside and adding it to your braid. So, as you prepare to cross the right strand over the middle again, pick up a small, even section of loose hair from the right side of your head. This new hair should be added to the right strand before you cross it over. You're, in a way, just making that strand a little thicker.
Do the same thing on the left side. When it's time to cross the left strand over the middle, gather a small, even section of loose hair from the left side of your head. Combine this new hair with your left strand before you bring it over. This process, you know, is what makes the braid sit close to your scalp and incorporate all your hair. It's a bit like gathering ingredients as you cook, adding them in at just the right moment.
The trick here is to try and keep the sections of added hair consistent in size. If you add too much at once, the braid can look lumpy, and if you add too little, it might not pick up all your hair smoothly. It’s a bit of a balancing act, really, but with practice, you’ll get a feel for it. This step, basically, is what gives the french braid its signature look.
Step 4: Keeping Your Hands Flat and Even
A really helpful tip for keeping your braid looking smooth and flat against your head is to keep your hands nice and flat to the scalp as you work. This helps keep the braid, you know, nice and close to your head, preventing it from puffing out or becoming too loose. It's a subtle movement, but it makes a big difference in the final look.
Think about how you hold the hair as you bring each section over and add new pieces. If your hands are lifted too far away from your head, the braid can start to pull and create gaps. By staying close, you maintain consistent tension, which is pretty important for a polished result. This technique, you see, is something that hairstylists often mention.
Maintaining even tension throughout the entire braiding process is, arguably, one of the most important aspects. If one section is too tight and another too loose, the braid will look uneven. It takes a little focus, but trying to apply the same gentle pull to each strand as you weave it will make your braid look much more professional, which is something everyone wants, right?
Step 5: Continuing Your Braid Down
You'll keep repeating the steps of crossing a side strand over the middle, and then adding a new section of loose hair to that strand before you cross it. You do this, you know, alternately from the right and left sides, working your way down your head. Each time you cross a strand, you're also incorporating more hair into the braid.
As you move further down your head, you'll find that the sections of hair you're adding will come from closer to your ears and then eventually from the nape of your neck. Try to keep the added sections roughly the same size each time. This helps the braid look consistent all the way down, which is really the goal here. It's a continuous motion, basically, until you've picked up all the hair.
Keep your hands close to your head and your tension even. It might feel a little awkward at first, especially when you get to the back of your head, but that's totally normal. Just keep practicing, and you'll find your rhythm. This part, you see, is where the braid really starts to take its full shape and length, which is pretty satisfying.
Step 6: Securing Your Finished Look
Once you've picked up all the loose hair from the sides of your head, you'll be left with a regular three-strand braid from that point down to the ends of your hair. Simply continue braiding in the traditional three-strand style until you reach the end of your hair. Then, secure the braid with a hair elastic or a hair tie. You want to make sure it's snug enough to hold, but not so tight that it causes discomfort.
At this point, you can gently tug on the loops of the braid to make it look a little fuller or softer, if that's the style you prefer. This is often called "pancaking" the braid, and it can give it a more relaxed, bohemian feel. It's a nice touch, honestly, that can really change the overall appearance of the braid.
Take a moment to admire your work! You’ve just created a classic french braid. It might not be absolutely perfect the very first time, and that's completely fine. The more you practice, the better and faster you’ll get. This final step, you know, is just about making sure your hard work stays put and looks great.
Tips for a Perfect French Braid
Learning how to do french braids for beginners really comes down to a few key tips that can make a big difference. One very important thing is to make sure your hair is properly detangled before you start. Any knots will just snag and pull, making the process frustrating. A smooth base is, honestly, essential for a smooth braid.
Another helpful hint is to use a little bit of hair product, like a light styling cream or a bit of hairspray, before you begin. This can help tame flyaways and give the hair a little more grip, making it easier to manage. It's not strictly necessary, but it can certainly make the process a bit smoother, you know?
Don't be afraid to take breaks if your arms get tired, or if you feel frustrated. Braiding your own hair can be a bit of a workout for your arms, especially when you're first learning. Step away for a moment, shake out your hands, and then come back to it. Patience, you see, is truly a virtue when learning new hair skills.
Practice, practice, practice! This really is the best way to get good at french braiding. The more you do it, the more your fingers will learn the movements, and the more natural it will feel. You might even want to try braiding a doll's hair or a friend's hair first, just to get the hang of the hand movements without the awkwardness of reaching behind your own head. It’s a skill that, basically, just gets better with repetition.
Going Beyond the Basic Braid
Once you've got the basic french braid down, you've actually unlocked the door to a whole world of other hairstyles. If you can master this foundational style, you can pretty much learn and master any other, more intricate styles as well, where a french braid is the basis. It's like learning the alphabet before you write a novel, you know?
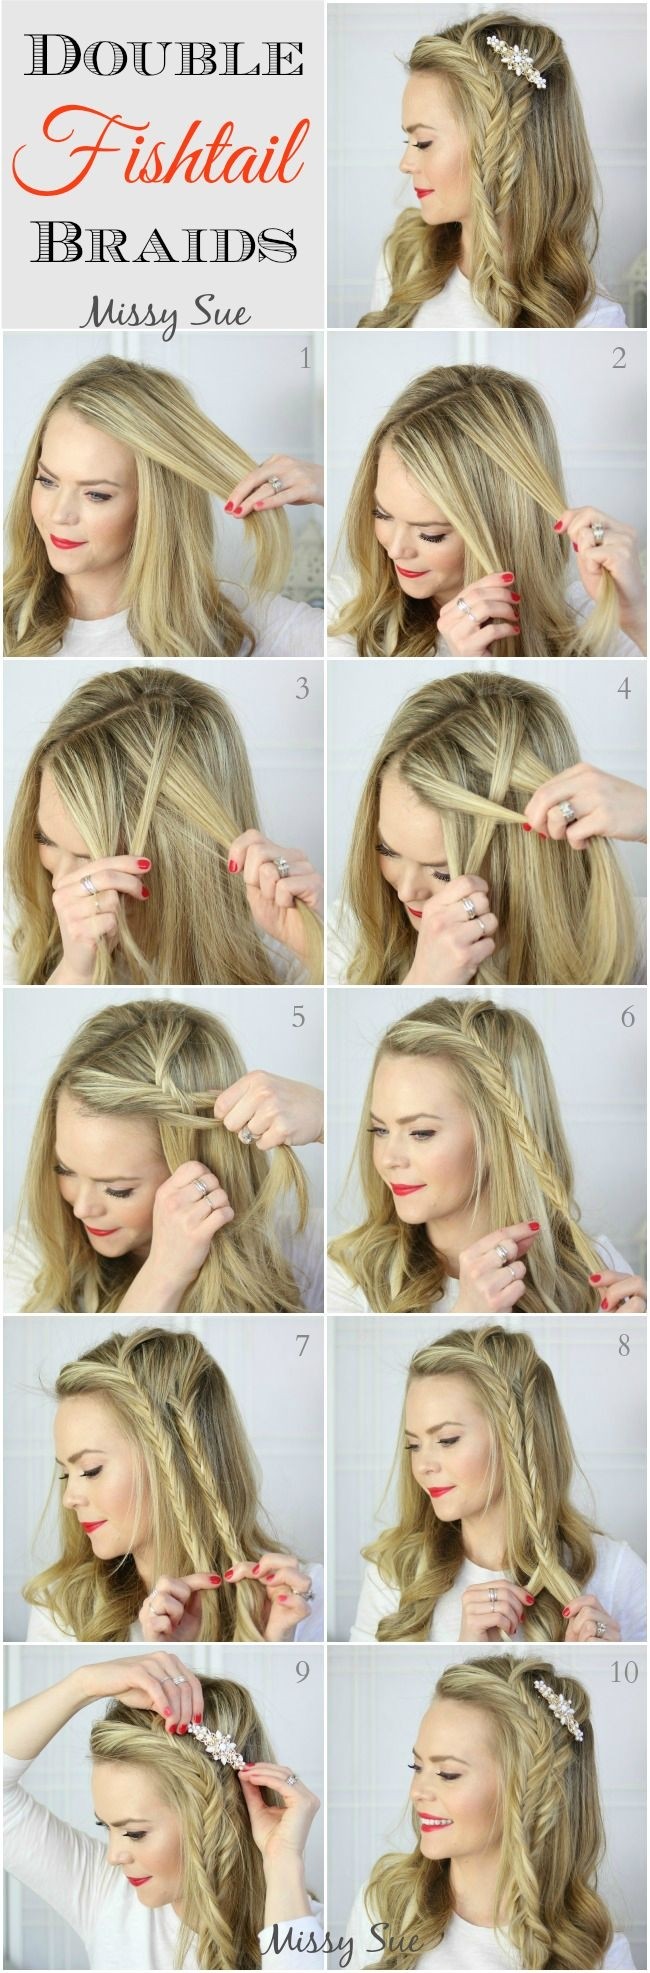
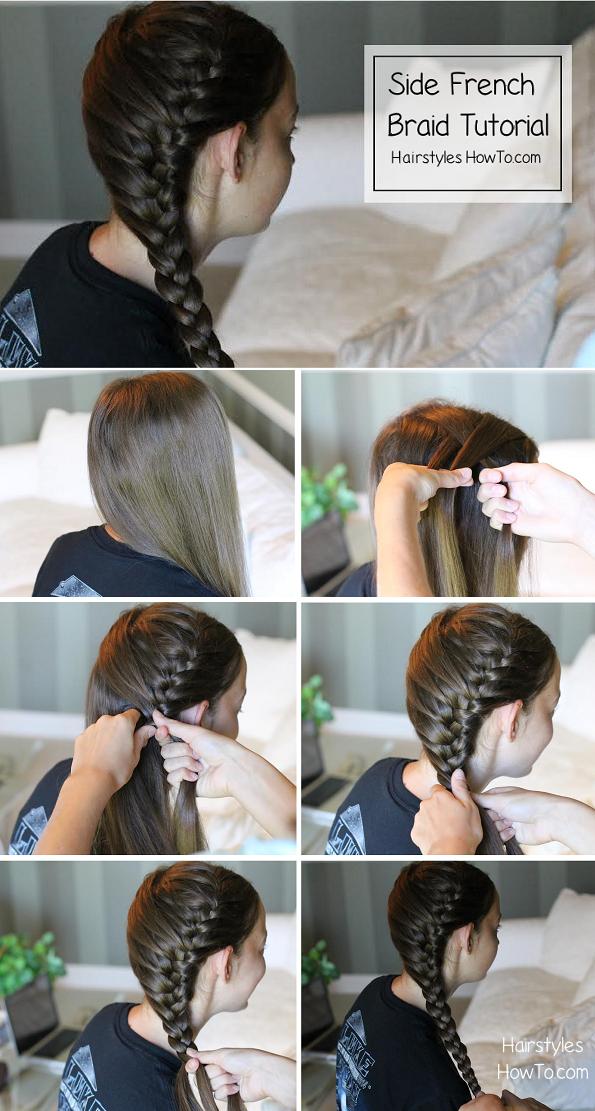
You can start trying out variations like a double french braid, where you create two braids on either side of your head. Or, you could try a front french braid, which often goes along your hairline and frames your face. These styles, you see, use the exact same technique, just applied in different ways or in different places on your head.
There are also reverse french braids (also known as Dutch braids), where you cross the strands *under* the middle instead of over. This makes the braid stand out more from your head, giving it a different texture and look. It's a cool variation, honestly, and it's not much harder once you know the basic over-crossing motion. You can learn more about different braiding techniques on our site.
Think about incorporating ribbons or scarves into your french braid for a fun, decorative touch. Or, try braiding your hair to one side for an asymmetrical look. The possibilities are, you know, pretty endless once you have the core skill. This basic tutorial is just the beginning of your hair styling adventures, which is really exciting!
Frequently Asked Questions About French Braids
How long does it take to learn how to french braid?
For most people, learning the hand movements and getting a smooth french braid can take a few practice sessions, maybe even a few days of trying. It really depends on how quickly your fingers get used to the motions and how much you practice. Some folks pick it up faster than others, you know, but everyone gets there eventually with enough effort. It's a bit like learning to ride a bike; it just clicks at some point.
Can you french braid your own hair?
Absolutely! Many people learn to french braid their own hair. It might feel a little awkward at first because you're reaching behind your head, and you can't see everything perfectly. But with a good mirror, and by feeling the hair with your fingers, you can definitely do it. It's a skill that, basically, just improves with repetition, so don't get discouraged if it's tricky at the very beginning.
What's the difference between a french braid and a dutch braid?
The main difference is how you cross the hair strands. In a french braid, you cross the side strands *over* the middle strand, which makes the braid lie flat against your head. In a Dutch braid (sometimes called a reverse french braid), you cross the side strands *under* the middle strand. This makes the braid stand out more, giving it a raised, rope-like appearance. Both are, you know, pretty cool styles, just with a slightly different look.
Your Braiding Journey Starts Now!
You’ve got all the steps now to create a beautiful, classic french braid. Remember, this french braid tutorial is easy to follow, and it breaks down each step. Whether you're aiming for a casual look or something more elegant, this style is perfect for any occasion. It’s a timeless look that never really goes out of style, you know?
The key, as we've talked about, is practice and patience. Don't worry if your first few attempts aren't perfect. Every time you try, you're getting better, and your fingers are learning the movements. Soon enough, you'll be able to whip out a french braid with ease, which is pretty amazing. You can also find more resources about french punctuation marks if you are interested in other topics.
We're here to help you master easy hairstyles, whether it's with one, double, or even front french braids. This detailed guide covers all the steps, showing you all you need to braid your own hair. So, grab your brush, find a good mirror, and give it a try today. You'll be surprised at what you can achieve! Learn more about hair styling tips on our site.
:max_bytes(150000):strip_icc()/The-Ultimate-French-Braid-Tutorial-75f65f852d3a495e8f2beed7a38b6504.png)
Detail Author:
- Name : Gianni Skiles
- Username : sipes.arnaldo
- Email : white.devonte@mosciski.info
- Birthdate : 1977-02-02
- Address : 611 Xavier Plains West Ollieville, ME 59414
- Phone : 757.852.4735
- Company : Rodriguez, Hermann and Reinger
- Job : Lay-Out Worker
- Bio : Beatae tempora vero quisquam eum modi. Aspernatur harum ipsa aut sint nihil praesentium earum. Dicta voluptatibus doloribus voluptatem non odio. Dolorem rerum culpa corporis doloremque ut quasi sint.
Socials
instagram:
- url : https://instagram.com/karlee.zulauf
- username : karlee.zulauf
- bio : Sapiente ea nam suscipit possimus quis qui vel. Inventore eos possimus totam excepturi.
- followers : 3668
- following : 2800
tiktok:
- url : https://tiktok.com/@zulaufk
- username : zulaufk
- bio : Modi repudiandae repudiandae ab quibusdam perferendis maxime.
- followers : 3750
- following : 526
