
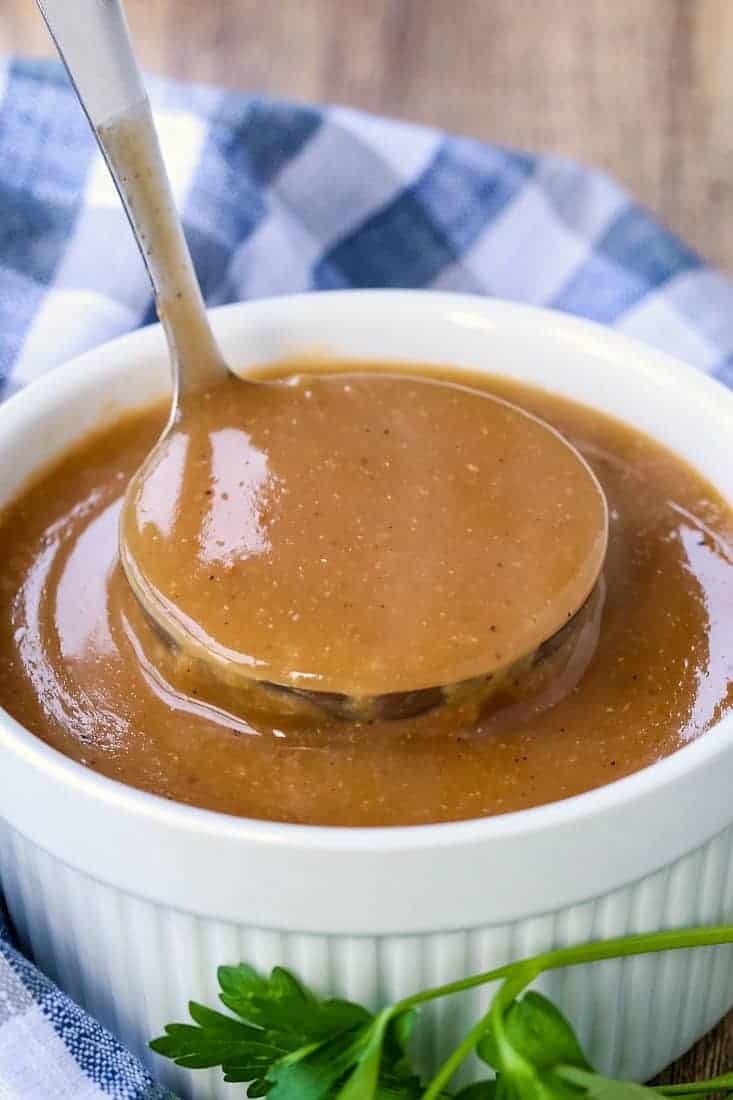
There's just something about a rich, savory gravy that brings a meal together, isn't there? So, when you've roasted a turkey, you've got this amazing opportunity right there in the pan. Those beautiful juices, the bits of browned goodness clinging to the bottom, they're not just leftovers; they're the start of something truly special. This is where the magic happens for making gravy from turkey drippings, a real showstopper that tastes so much better than anything from a packet. It's a quick and easy way to get delicious depth of flavor, a truly great addition to any meal you're putting together, especially this time of year.
You know, gravy, at its heart, is a sauce that comes from the natural juices of meats and vegetables as they cook. These flavorful liquids, often thickened a bit for a nicer feel in your mouth, are what make a meal feel complete. A homemade version, especially when it uses those precious turkey drippings, really makes a difference. It can be further colored to look just right on your plate, too. It's about taking what's already there and turning it into something even more wonderful, a truly simple process, actually.
If you've ever felt a bit lost trying to get that perfect homemade gravy, maybe ending up with something too thin or not very tasty, then you're in the right spot. Basically, we're going to walk through how to make homemade gravy from scratch, whether you've got a lot of pan drippings or just a little. This recipe helps you avoid those struggles, giving you a gravy that's full of taste and just the right texture every single time. It's an easy way to get a result that everyone will love, honestly.
Table of Contents
- The Foundation of Flavor: Turkey Drippings
- Gathering Your Gravy-Making Tools
- Starting with the Pan: Degreasing and Deglazing
- The Secret to Thickness: Making a Roux
- Adding the Liquid and Building Flavor
- Avoiding Lumps and Getting It Smooth
- Making It Your Own: Adjusting and Seasoning
- Serving Your Homemade Gravy
- Frequently Asked Questions About Turkey Gravy
The Foundation of Flavor: Turkey Drippings
The very best gravy, you know, really starts with those wonderful turkey drippings. These are the natural juices and fats that gather at the bottom of your roasting pan as your turkey cooks. They hold so much of the turkey's essence, a really deep, meaty flavor that you just can't get any other way. Using these drippings means your gravy will taste truly authentic, like it belongs with that beautiful bird you just made. It's a simple idea, yet it makes all the difference in the world for taste.
When your turkey is done cooking, and you take it out of the pan to rest, you'll see a collection of liquid and browned bits. That liquid is gold. It’s a mix of fat and concentrated turkey juice, and those browned bits, sometimes called "fond," are packed with even more flavor. They are basically the key to a gravy that tastes rich and full. We're going to use all of it to create something truly delicious, something that really complements your meal, anyway.
Even if you don't have a lot of drippings, or if you're making gravy without a roasted turkey, you can still get a great result. The core idea is to build flavor, and while drippings are best, there are ways to work around it. But for the absolute best taste, those turkey drippings are where you want to begin. They provide a richness that's hard to beat, so it's worth collecting every drop, truly.
Gathering Your Gravy-Making Tools
Before you get started, it's a good idea to have everything ready. This makes the whole process smoother and more enjoyable. You'll need your roasting pan, of course, with all those lovely drippings inside. A fat separator is super helpful, but a ladle or a spoon works too. You'll also want a whisk, a saucepan, and some measuring cups. Having these items at hand means you won't be scrambling mid-gravy, which is always a good thing, you know.
For ingredients, besides the drippings, you'll need a thickener. Flour is a common choice, but cornstarch works too. You'll also want some liquid, like chicken stock or beef stock. My text mentions using both chicken and beef stock cubes for the best flavor and a nice deep brown color, which is a really good tip for getting that rich taste and look. Having these liquids ready means you can adjust the gravy's consistency and flavor as you go, which is pretty useful.
A little salt and pepper, maybe some herbs like thyme or sage, can really round out the flavor. It’s all about building layers of taste. Having these seasonings nearby lets you adjust the gravy to your liking at the end. This preparation makes the whole gravy-making process less of a rush and more of a calm, enjoyable cooking moment, which is what you want, more or less.
Starting with the Pan: Degreasing and Deglazing
The first step after taking your turkey out is to deal with what's left in the pan. This is where you get those wonderful drippings ready for gravy. It involves two main parts: getting rid of some of the fat and then loosening up all those tasty browned bits stuck to the bottom. This process really sets the stage for a flavorful gravy, so it's worth taking your time with it, naturally.
Separating the Good Stuff
Those drippings in the pan are a mix of fat and flavorful juices. While fat adds some richness, too much can make your gravy greasy. So, you'll want to separate them. The easiest way to do this is to pour all the pan contents into a fat separator. The fat will rise to the top, and the good, clear juices will stay at the bottom. You can then pour out the juices, leaving most of the fat behind. If you don't have a separator, you can let the drippings sit for a few minutes until the fat floats, then carefully spoon off the fat from the top. You want to save a little bit of that fat for the next step, maybe a couple of tablespoons, actually.
Getting All Those Bits
Once you've separated the fat, put your roasting pan back on the stovetop over medium heat. Add a little bit of that reserved turkey fat, maybe a tablespoon or two, to the pan. Then, pour in a splash of liquid, like chicken stock or even just water. As the liquid heats up, use a wooden spoon or a whisk to scrape up all those browned, flavorful bits stuck to the bottom of the pan. This process is called deglazing, and it's super important for getting all that deep flavor into your gravy. These bits are pure flavor, so you want to get every single one, you know.
Keep stirring and scraping until all those browned bits have loosened up and dissolved into the liquid. This concentrated liquid is incredibly flavorful and will form the base of your gravy. It's truly amazing how much taste comes from these simple steps. This step makes a huge difference in the final taste, making your gravy truly special, more or less.
The Secret to Thickness: Making a Roux
To get that lovely, thick texture, you'll need to make a roux. A roux is simply a mixture of fat and flour cooked together, and it's a common way to thicken sauces. In a saucepan, melt a few tablespoons of butter or use some of that reserved turkey fat you separated earlier. Once the fat is melted and shimmering, sprinkle in an equal amount of flour. For example, if you used two tablespoons of fat, use two tablespoons of flour. This is where the magic of thickening begins, and it's pretty straightforward, really.
Whisk the fat and flour together constantly over medium heat. It will form a paste. Keep cooking it for a minute or two, still whisking. This cooks out the raw flour taste, which is important for a smooth, pleasant flavor. You'll notice it start to smell a bit nutty, and it might turn a light golden color. This cooked flour mixture is what will give your gravy its body and smooth feel. It's a foundational step for any good gravy, honestly.
The longer you cook the roux, the darker it gets, and the less thickening power it has, but the more nutty flavor it develops. For turkey gravy, a light to medium roux is usually best, just enough to cook out the flour taste without making it too dark. This step is crucial for avoiding thin, flavorless homemade gravy, as my text points out. It's a simple technique, but it makes all the difference, you know.
Adding the Liquid and Building Flavor
Now comes the exciting part: adding the liquid to your roux. This is where your gravy starts to take shape. Gradually pour in the deglazed pan drippings you collected earlier, whisking constantly as you pour. This constant whisking is super important for preventing lumps. The hot roux will quickly absorb the liquid, and you'll see it start to thicken almost immediately. It's a satisfying moment, watching it transform, you know.
After the drippings are incorporated, slowly add more liquid, like chicken or beef stock. My text suggests using both chicken and beef stock cubes for the best flavor and a nice deep brown color, which is a really clever way to add richness. You want to add the stock a little at a time, whisking well after each addition. This allows you to control the thickness of your gravy. If you add it all at once, it might become too thin or lumpy. It's a bit like a dance, adding and whisking, more or less.
Keep adding stock until your gravy reaches the consistency you like. Some people prefer a thicker gravy, while others like it a bit looser. You are the chef, so you get to decide! Continue to whisk and cook over medium heat until the gravy is simmering gently and has thickened to your preference. This gradual addition of liquid is key to a smooth, perfect gravy, truly.
Avoiding Lumps and Getting It Smooth
Lumps are the bane of any gravy maker, but they are totally avoidable. The secret, as my text mentions, is to learn how to deglaze the pan, make a roux, add stock, and avoid making lumps. The constant whisking is your best friend here. When you add the liquid to the roux, do it slowly and whisk vigorously. This helps the flour particles mix evenly with the liquid without clumping together. It's a bit like mixing paint, you know; you want it smooth.
If, despite your best efforts, you do end up with a few lumps, don't despair! You have a couple of options. You can press the gravy through a fine-mesh sieve. This will catch any lumps and leave you with a perfectly smooth gravy. Another trick is to use an immersion blender right in the saucepan. Just a few quick pulses will smooth out any stubborn lumps. It's a quick fix that really works, honestly.
Another tip for smoothness is to make sure your stock is warm or at room temperature, rather than cold, when you add it to the hot roux. A big temperature difference can sometimes encourage lumps. A warm liquid blends more easily with the roux, making for a smoother gravy from the start. So, a little preparation here really pays off, you know.
Making It Your Own: Adjusting and Seasoning
Once your gravy has reached the right consistency, it's time to taste and adjust the seasoning. This is where you can truly make it your own. Start with salt and pepper. Remember that the turkey drippings and any stock you used might already have some salt, so add a little at a time, taste, and then add more if needed. It’s always easier to add more than to take it away, which is pretty much always true in cooking.
You can also add other flavors. A pinch of dried herbs like sage or thyme can really complement the turkey flavor. A tiny splash of Worcestershire sauce or a dash of soy sauce can add a deeper, more savory note, too. Some people like a touch of garlic powder or onion powder. It’s all about what tastes good to you and your family. Experiment a little, and you might discover your new favorite secret ingredient, you know.
If your gravy seems a little bland, you can always add more of those flavorful pan drippings or a bit more concentrated stock. If it’s too thick, simply whisk in a little more warm stock or water until it reaches your desired consistency. If it's too thin, you can make a small slurry of cornstarch and cold water, then whisk it into the simmering gravy a little at a time until it thickens. This flexibility means you can always get it just right, which is very reassuring.
Serving Your Homemade Gravy
Homemade gravy from turkey drippings is an absolute must during the holidays, as my text points out. It’s delicious added to almost every part of the meal. Think about drizzling it generously over slices of roast turkey, mashed potatoes, or even flaky biscuits. It just makes everything taste better, adding that extra layer of comfort and flavor that everyone loves. It’s truly a centerpiece of the meal, you know.
Serve your gravy warm, as it tends to thicken as it cools. If you make it ahead of time, you can gently reheat it on the stovetop over low heat, whisking in a little more stock or water if it's too thick. A well-made gravy is a sign of a thoughtful cook, and it really shows you put effort into the meal. It's a simple touch that makes a big impact on the overall dining experience, honestly.
So, the next time you roast a turkey, remember that the pan drippings are a gift. Don't let them go to waste! With these steps, you can easily transform them into a rich, flavorful gravy that will elevate your meal and bring smiles to everyone at the table. It's a tradition worth keeping, and it's surprisingly simple to master, really.
Frequently Asked Questions About Turkey Gravy
Can I make gravy from turkey drippings without using flour?
Absolutely! If you prefer not to use flour, you can thicken your gravy with cornstarch. Just mix a tablespoon of cornstarch with an equal amount of cold water to create a smooth slurry. Slowly whisk this mixture into your simmering gravy until it reaches your desired thickness. This method results in a very clear, glossy gravy, which is a nice alternative, you know.
Can I make turkey gravy ahead of time?
Yes, you can certainly make turkey gravy ahead of time. Prepare it as usual, then let it cool completely before storing it in an airtight container in the refrigerator for up to three or four days. When you're ready to serve, gently reheat the gravy on the stovetop over low heat, whisking constantly. You might need to add a splash of chicken stock or water to thin it out to the right consistency, as it will thicken as it cools. It's a great way to save time on the big day, you know.
What if I don't have enough turkey drippings for my gravy?
Don't worry if you don't have a lot of turkey drippings! You can still make a flavorful gravy. Simply supplement your drippings with more chicken or beef stock. You can also brown a little butter or oil in the pan before making your roux to add some richness. For extra depth, roast some turkey wings or necks beforehand to create a homemade stock, or use a good quality store-bought broth. The secret, as my text says, is to use both chicken and beef stock cubes for a nice deep flavor and color. It's all about building that taste, you know.
For more detailed cooking tips and delicious recipes, you can always check out a reputable culinary resource. Learn more about on our site, and link to this page for other great ideas.
:max_bytes(150000):strip_icc()/__opt__aboutcom__coeus__resources__content_migration__simply_recipes__uploads__2005__12__how-to-make-gravy-horiz-a-1600-4846b0222fbe4455903fc9ad93fbd280.jpg)
:max_bytes(150000):strip_icc()/7497364-how-to-make-gravy-from-scratch-ddmfs_4x3_1744-c16d4d6a799c468a86908e1f52347191.jpg)
Detail Author:
- Name : Aaron Corwin DVM
- Username : maci33
- Email : iharber@hotmail.com
- Birthdate : 1978-06-17
- Address : 91217 Ora Route West Alenaborough, OK 34791-0539
- Phone : 1-364-635-6579
- Company : Stehr-Quigley
- Job : Numerical Tool Programmer OR Process Control Programmer
- Bio : Debitis sed nisi alias dolorum ea. Placeat eligendi et dolorem qui eum aut molestiae. Dolores vel quos eligendi inventore. Dolor sit consequatur odit eligendi facere rerum quae.
Socials
tiktok:
- url : https://tiktok.com/@gregmante
- username : gregmante
- bio : Eligendi voluptatibus nesciunt quas corrupti et quos.
- followers : 3291
- following : 649
twitter:
- url : https://twitter.com/mante1994
- username : mante1994
- bio : Quia provident eveniet explicabo mollitia. Aut tempore expedita velit voluptatem non cum. Autem inventore sint suscipit laboriosam voluptate labore.
- followers : 3545
- following : 220
instagram:
- url : https://instagram.com/gmante
- username : gmante
- bio : Nesciunt totam voluptatem repellendus molestiae. Qui enim ut laborum qui et.
- followers : 2865
- following : 1191
linkedin:
- url : https://linkedin.com/in/greg5123
- username : greg5123
- bio : Velit nam doloremque deserunt laboriosam.
- followers : 5527
- following : 2879
facebook:
- url : https://facebook.com/gregmante
- username : gregmante
- bio : Optio possimus vel assumenda maxime libero autem.
- followers : 289
- following : 2239
