
Ever wanted to create a hairstyle that looks incredibly intricate but is, in fact, surprisingly simple to achieve? The fish braid, sometimes called a fishtail braid, offers just that. It's a gorgeous style that gives off an air of effortless elegance, perfect for almost any occasion. Whether you're getting ready for a casual day out or a special event, learning how to braid a fish braid can really make a difference in your hair game, you know?
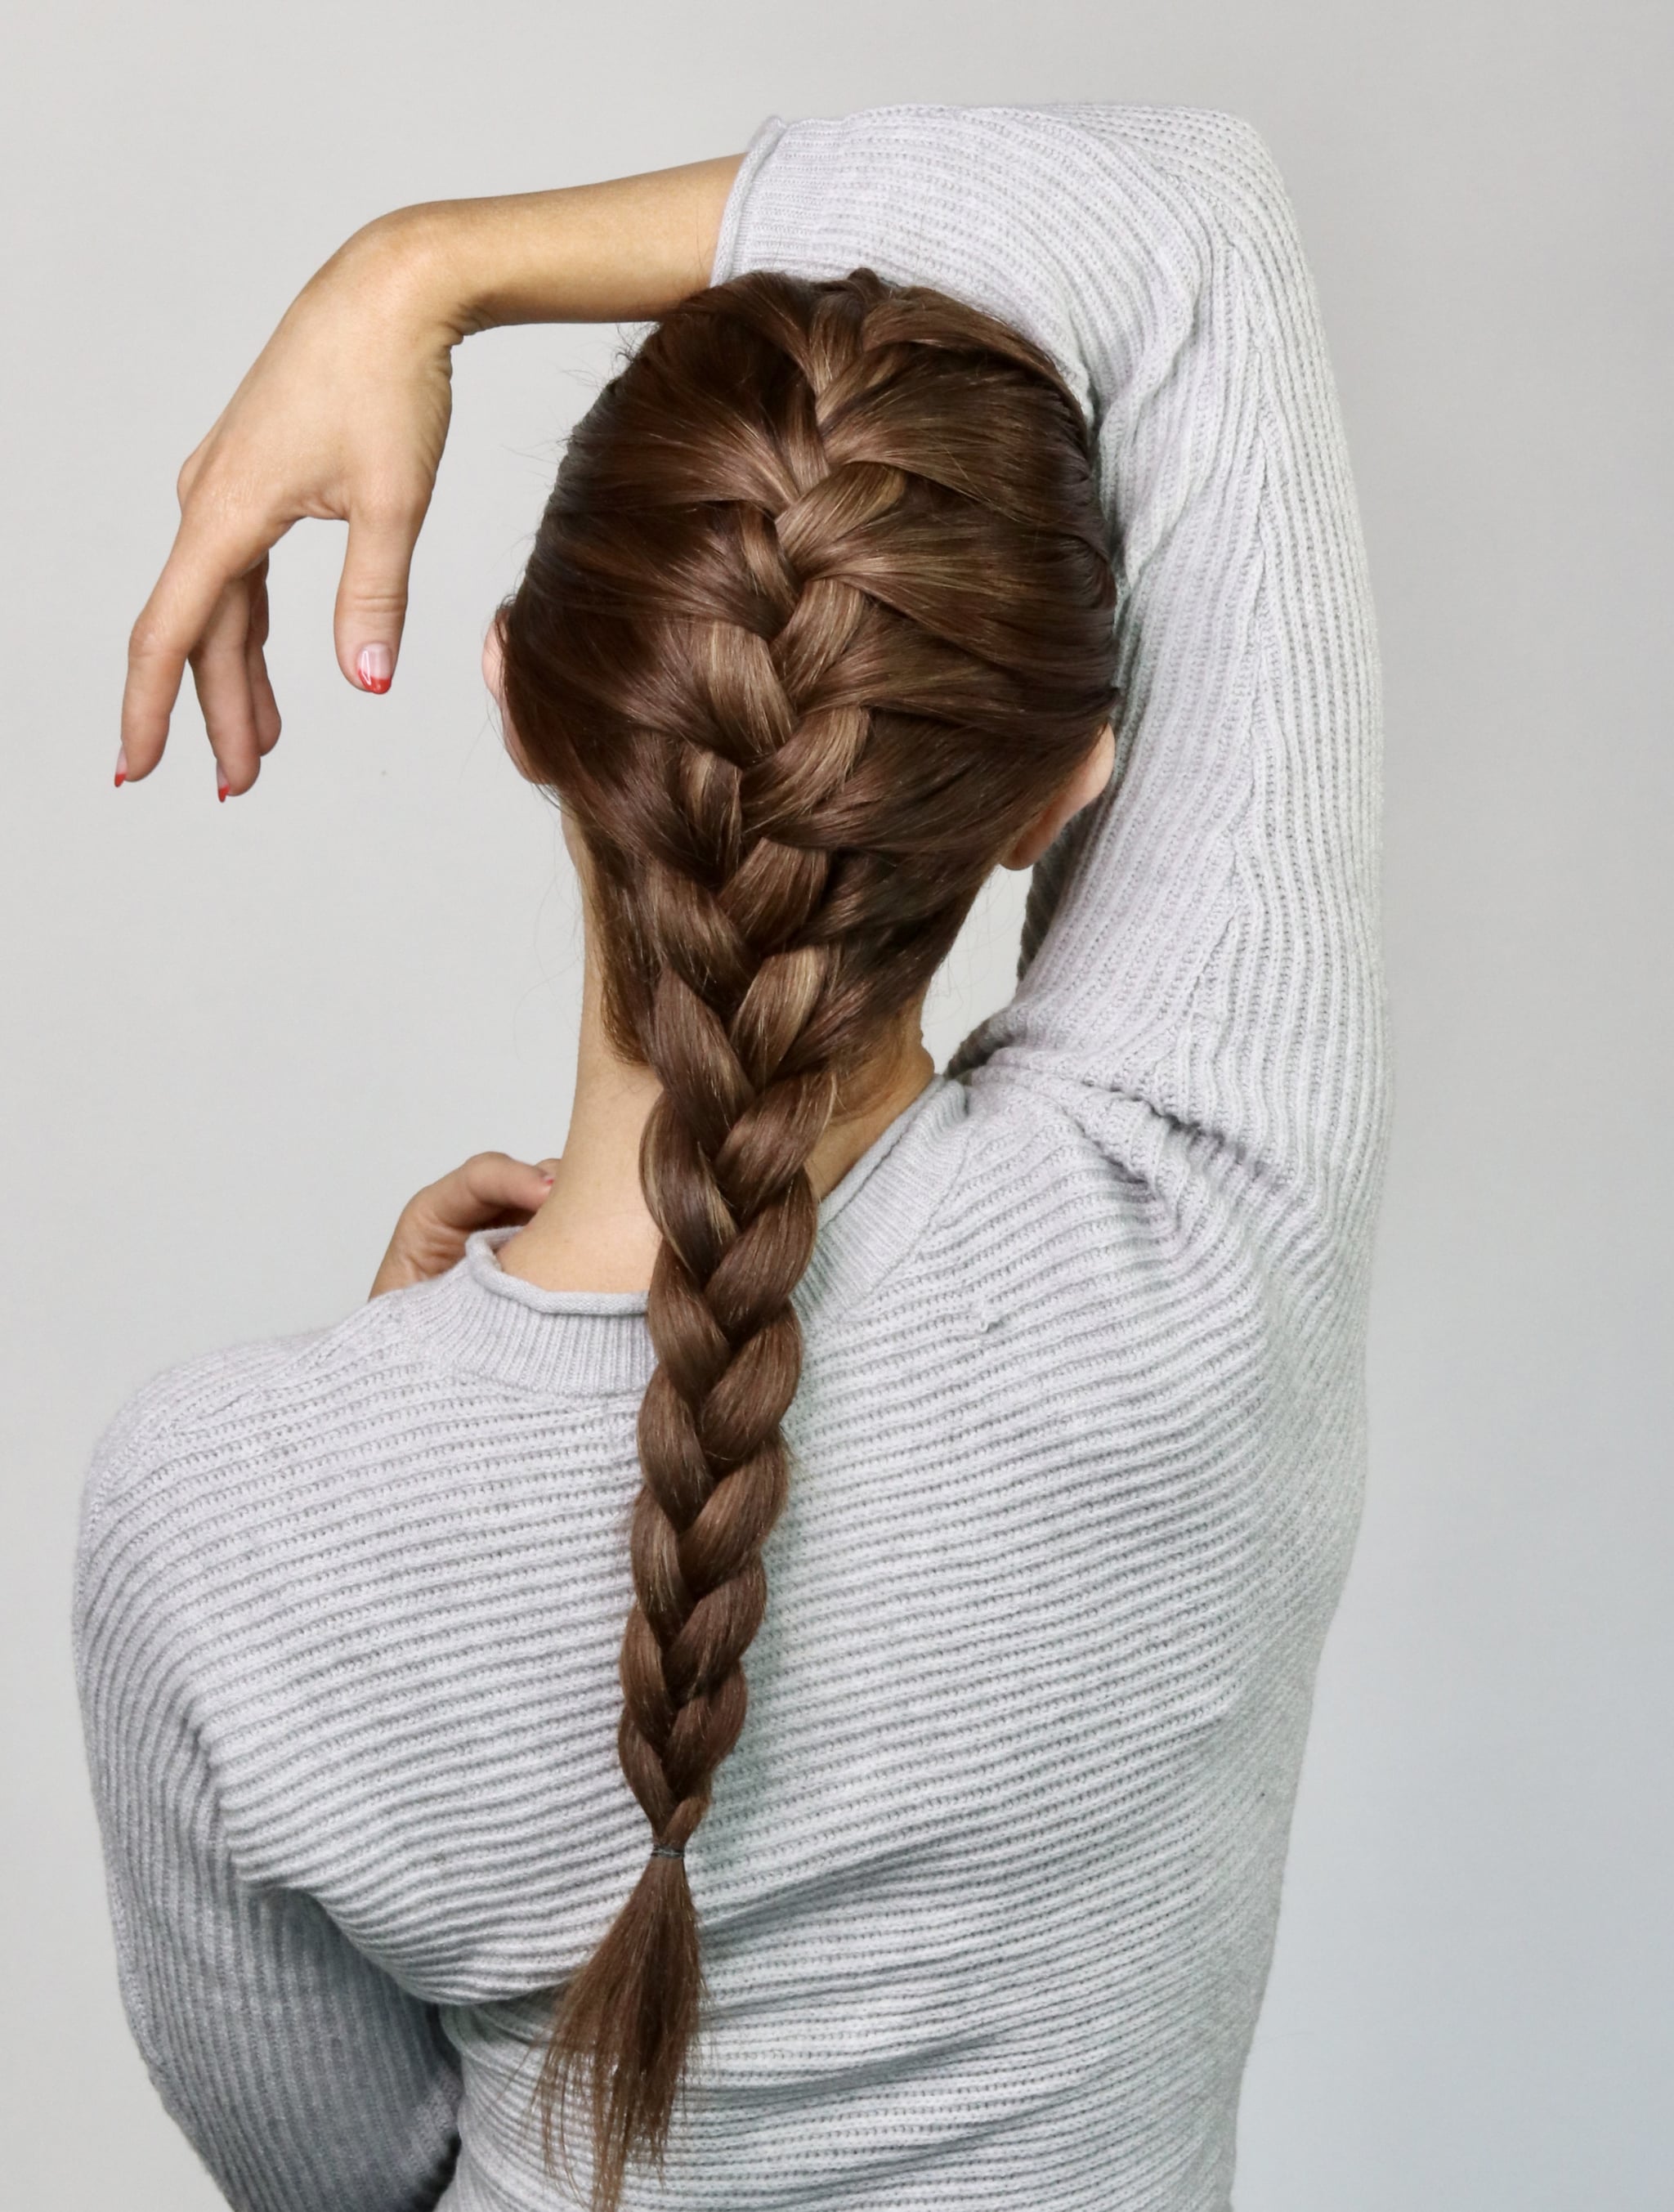
This beautiful braid has a unique texture, a bit like a fish's skeleton, which is where it gets its name. It's a fantastic alternative to a regular three-strand plait, offering a more refined and detailed appearance. You might think it looks complicated, but honestly, it's pretty much just two sections of hair, constantly crossing small pieces over, so it's not as hard as it seems.
In this guide, we're going to walk you through everything you need to know about how to braid a fish braid. We'll cover the tools, the preparation, and a clear, step-by-step process. You'll also pick up some handy tips for keeping your braid looking its best and find answers to common questions. So, let's get started on creating this lovely hairstyle, alright?
Table of Contents
- What Exactly is a Fish Braid?
- Getting Ready: What You'll Need
- Step-by-Step: How to Braid a Fish Braid
- Troubleshooting Common Fish Braid Woes
- Tips for a Flawless Fish Braid Every Time
- Styling Your Fish Braid: Beyond the Basic
- Keeping Your Fish Braid Fresh
- Frequently Asked Questions About Fish Braids
What Exactly is a Fish Braid?
A fish braid, or fishtail braid, is a kind of plait that looks like a series of small, interlocking "V" shapes. It gives a really unique, textured appearance compared to a regular braid. Instead of three sections, you only work with two main sections of hair. Then, you take small pieces from the outside of each section and cross them over to the inside of the opposite section. It’s a bit like weaving, you know, making a tight pattern.
This technique creates a strong, neat pattern, sort of like how a good, sturdy fishing braid holds up under tension. The way the strands come together, it’s all about getting those smaller pieces to cross over smoothly, ensuring no slips, which, as a matter of fact, is pretty important for any kind of braid, whether it's for hair or for fishing line. The finished look is often described as elegant and a little bit bohemian, too it's almost.
Getting Ready: What You'll Need
Before you begin learning how to braid a fish braid, it helps to have your tools ready. Just like preparing for any task, having the right things on hand makes the process much smoother. You don't want to be scrambling for a hair tie in the middle of your braiding, that's for sure.
Essential Tools
- A comb or brush: For smoothing out your hair and removing any tangles.
- Hair ties or elastic bands: Small, clear ones work best for securing the end of your braid.
- Hair spray (optional): To help tame flyaways and keep your braid looking neat.
- Bobby pins (optional): For securing any loose strands or adding decorative touches.
- A mirror: To see what you're doing, especially if you're braiding your own hair.
Hair Preparation
Getting your hair ready is a pretty important first step. A smooth, tangle-free base makes braiding much easier and gives you a much neater result. You want your hair to be cooperative, basically.
- Start with dry or slightly damp hair. Some people find it easier to braid hair that isn't freshly washed, as it has a bit more grip.
- Brush or comb through your hair thoroughly to remove all knots and tangles. This is probably the most crucial part for a smooth braid.
- If your hair is very fine or slippery, you might want to apply a little texturizing spray or dry shampoo. This adds some grip, which can be really helpful, especially for beginners.
- Decide where you want your fish braid to sit. Will it be a single braid down your back, a side braid, or maybe two pigtail braids?
Step-by-Step: How to Braid a Fish Braid
Now for the fun part! This is where you actually learn how to braid a fish braid. It might take a little practice at first, but you'll get the hang of it pretty quickly, you know. Think of it like learning a new knot; it takes a controlled environment and some repetition to get it just right, and that's okay.
The Classic Single Fish Braid
This is the basic version, usually done down the back. It’s a really versatile style, good for everyday or a special event.
- Gather all your hair at the nape of your neck, or wherever you want the braid to start. If you prefer a messier look, don't worry too much about it being super neat at the start.
- Divide your hair into two equal sections. Let's call them Section A (left) and Section B (right). This is your starting point, basically two big chunks of hair.
- Take a small piece of hair from the outer edge of Section A. This piece should be about half an inch thick, or even thinner for a more detailed braid.
- Bring this small piece over Section A and add it to the inner side of Section B. So, it crosses over.
- Now, take a small piece of hair from the outer edge of Section B. Again, make it about the same size as the first piece.
- Bring this second small piece over Section B and add it to the inner side of Section A. You're just repeating the same movement, but on the other side.
- Continue alternating these steps: taking a small piece from the outside of one main section, crossing it over, and adding it to the inside of the other main section.
- Keep your tension consistent as you braid. This helps keep the braid looking uniform and prevents it from unraveling. It’s a bit like making sure your fishing line is spooled evenly; consistent tension is key for a good outcome, apparently.
- Braid all the way down to the ends of your hair, or as far as you want the braid to go.
- Secure the end of your braid with a hair tie or elastic band.
- Once secured, you can gently pull on the sides of the braid to loosen it up and make it appear fuller and wider. This is called "pancaking" the braid, and it really adds to the soft, romantic look.
Trying a Side Fish Braid
A side fish braid is a really charming variation. It's perfect for showing off the intricate pattern, and it keeps your hair out of your face, too. It’s pretty much the same steps, just starting in a different spot.
- Gather all your hair over one shoulder.
- Divide the hair into two equal sections, just like for the classic braid.
- Follow steps 3-10 from "The Classic Single Fish Braid" section, continuing to braid down the side of your neck and over your shoulder.
- Secure with a hair tie. You can also pull out a few face-framing pieces for a softer feel.
The Double Fish Braid Look
For a playful and trendy look, try two fish braids, one on each side. This is often called "pigtail fish braids" or "double fishtails." It’s basically doing the single braid technique twice, which, you know, doubles the fun.
- Part your hair down the middle, from your forehead all the way to the nape of your neck.
- Secure one side of your hair with a temporary hair tie or clip to keep it out of the way.
- On the unsecured side, divide the hair into two equal sections.
- Follow steps 3-10 from "The Classic Single Fish Braid" section to create your first fish braid. Secure it with a hair tie.
- Release the secured side of your hair and repeat the process (steps 3-10) to create your second fish braid.
- Make sure both braids are roughly the same length and tightness for a balanced look.
Troubleshooting Common Fish Braid Woes
Sometimes, things don't go exactly as planned when you're learning how to braid a fish braid. That's totally normal, you know. Even experienced braiders have their off days. Here are some common issues and how to fix them, because, well, practice makes perfect, right?
- Uneven Sections: If your braid looks lopsided, you might be taking uneven pieces of hair. Try to be consistent with the size of the small sections you cross over. Using a mirror can really help you see what you're doing.
- Loose Braid: If your braid feels too loose and falls apart easily, you're probably not keeping enough tension. Pull each crossed-over section snug as you add it to the main section. It's a bit like tying a knot; if it's too loose, it just won't hold, basically.
- Flyaways and Frizz: For stray hairs, a little hair spray before or during braiding can help. You can also smooth down flyaways with a bit of hair gel or styling cream on your fingertips once the braid is done.
- Difficulty Reaching the Back: If you're braiding your own hair, try doing it over one shoulder or even in front of a second mirror to get a better view. Some people find it easier to start with a low ponytail before dividing into two sections, which gives a bit more control.
- Braid Looks Messy: Sometimes a "messy" look is intentional, but if you want neatness, make sure your hair is thoroughly brushed and smooth before you start. Taking very small, precise sections will also give a much cleaner, more intricate appearance.
Tips for a Flawless Fish Braid Every Time
Once you've got the basic steps down for how to braid a fish braid, these little tricks can really elevate your style. They're pretty simple, but they make a big difference, you know.
- Practice Makes Perfect: Seriously, the more you do it, the better and faster you'll get. Don't get discouraged if your first few attempts aren't perfect.
- Work with Smaller Sections: The smaller the pieces of hair you cross over, the more intricate and detailed your fish braid will look. This also means it will take a bit longer, but the result is usually worth it.
- Keep Consistent Tension: This is a big one. Even tension throughout the braid helps it look neat and uniform from top to bottom. It's a bit like how a good, strong fishing line needs consistent tension when it's being spooled; it keeps everything in place.
- Use a Mirror: If you're braiding your own hair, using a mirror (or even two) can really help you see what you're doing, especially at the back of your head.
- "Pancake" Your Braid: Once your braid is secured, gently pull on the outer loops of the braid. This makes it look wider, fuller, and more relaxed. It can really transform a thin braid into something much more substantial.
- Start with a Ponytail: If you find it hard to manage all your hair, gather it into a low ponytail first. Then, divide the ponytail into two sections and start braiding from there. This gives you a more stable base.
- Consider Hair Texture: The "My text" talks about different types of braid for fishing, and hair is similar. Some hair types hold braids better than others. If your hair is super fine, a little texturizing spray can help give it grip. If it's very thick, you might need to take slightly larger sections to make the process manageable.
Styling Your Fish Braid: Beyond the Basic
Learning how to braid a fish braid opens up a whole world of styling possibilities. It’s not just for a single braid down your back, you know. There are so many ways to wear it, making it pretty versatile for different looks and events.
- Half-Up, Half-Down: Braid the top section of your hair into a fish braid, leaving the rest of your hair down. This is a lovely, softer look.
- Braided Crown: Create two fish braids on either side of your head, then wrap them around to form a crown and secure with bobby pins. This is really elegant, actually.
- Accent Braid: Use a small fish braid as an accent in another hairstyle, like a messy bun or a regular ponytail. It adds a touch of detail.
- Braid with Accessories: Add some decorative pins, clips, or even fresh flowers to your fish braid for a special occasion.
- Loose and Messy: After braiding, gently pull out some strands around your face and loosen the braid for a relaxed, bohemian vibe. This is often a favorite, giving off that "effortless" look.
Keeping Your Fish Braid Fresh
Once you've put in the effort to create a beautiful fish braid, you'll want it to last. Here are a few tips to help keep your braid looking neat and tidy for longer, which, you know, saves you time in the long run.
- Sleep Smart: To preserve your braid overnight, you can wrap a silk scarf around your head or sleep on a silk pillowcase. This reduces friction and helps prevent frizz and loosening.
- Refresh with Dry Shampoo: If your scalp gets oily, a little dry shampoo at the roots can help extend the life of your braid.
- Tame Flyaways: For any stray hairs that pop out, a tiny bit of hairspray on your fingertips or a small amount of hair gel can smooth them back into place.
- Re-tighten if Needed: If your braid starts to loosen significantly, you can sometimes carefully re-tighten sections by pulling on the strands or securing with extra bobby pins.
- Consider the "Braid Color": The "My text" mentions how braid color doesn't matter much for fish seeing it, and for hair, the style itself is often more important than the hair color for a fish braid. The texture and neatness are what really make it stand out, regardless of whether your hair is dark, light, or somewhere in between.
Frequently Asked Questions About Fish Braids
People often have a few questions when they're learning how to braid a fish braid. Here are some common ones, with some straightforward answers, because, you know, it's good to clear things up.
Is a fish braid hard to do?
It might look a bit complicated at first glance, but honestly, it's pretty simple once you get the hang of the two-strand technique. It usually takes a few tries to feel comfortable with the motions, but many people find it easier than a traditional three-strand braid, actually. Just keep practicing, and you'll get it down.
How long does a fish braid last?
A well-done fish braid can last anywhere from a few hours to a couple of days, depending on your hair type and how active you are. If you secure it properly and use some hairspray, it tends to hold up pretty well. Sleeping on a silk pillowcase can also help extend its life, which is a pretty neat trick.
Can you do a fish braid on short hair?
Yes, you can! While it's easier on longer hair, you can definitely do a fish braid on shorter hair, especially if it's shoulder-length or a little longer. You might need to use more bobby pins to secure shorter layers, and the braid itself will be shorter, but it still creates that lovely, intricate pattern. It's more about having enough length to cross over the strands, you know.
Learning how to braid a fish braid is a skill that really adds something special to your hairstyling repertoire. It's a timeless look that can be dressed up or down, and it gives off such a charming, put-together vibe. With a little practice and patience, you'll be creating beautiful fish braids in no time. For more great hair ideas and beauty tips, you can always check out resources like this one. Learn more about hair styling techniques on our site, and for other creative ideas, link to this page here.


Detail Author:
- Name : Prof. Max Moore DVM
- Username : susanna31
- Email : riley30@schuster.com
- Birthdate : 1973-03-17
- Address : 65800 Anika Cliff Apt. 046 Idellside, KY 83667-7783
- Phone : 313-249-8766
- Company : Stamm, Windler and Cremin
- Job : Photographer
- Bio : Quibusdam voluptas ut pariatur molestiae. Omnis vero distinctio aut non aut eum doloribus. Officia porro ducimus ea deleniti voluptatem a. Velit ut non molestiae.
Socials
tiktok:
- url : https://tiktok.com/@sstokes
- username : sstokes
- bio : Consectetur incidunt libero corrupti deserunt. Iusto in libero qui qui.
- followers : 5569
- following : 1805
instagram:
- url : https://instagram.com/stokess
- username : stokess
- bio : Odit eos id dolorum. Sit deleniti quasi nihil nostrum. Voluptates qui ipsum est fuga.
- followers : 1933
- following : 1065
twitter:
- url : https://twitter.com/stokess
- username : stokess
- bio : Est culpa repellendus iste error earum animi similique. Et quia deleniti laborum consequatur eos reprehenderit. Aut voluptatibus minus illo aut.
- followers : 6134
- following : 530
